Table of Contents
Prerequisites
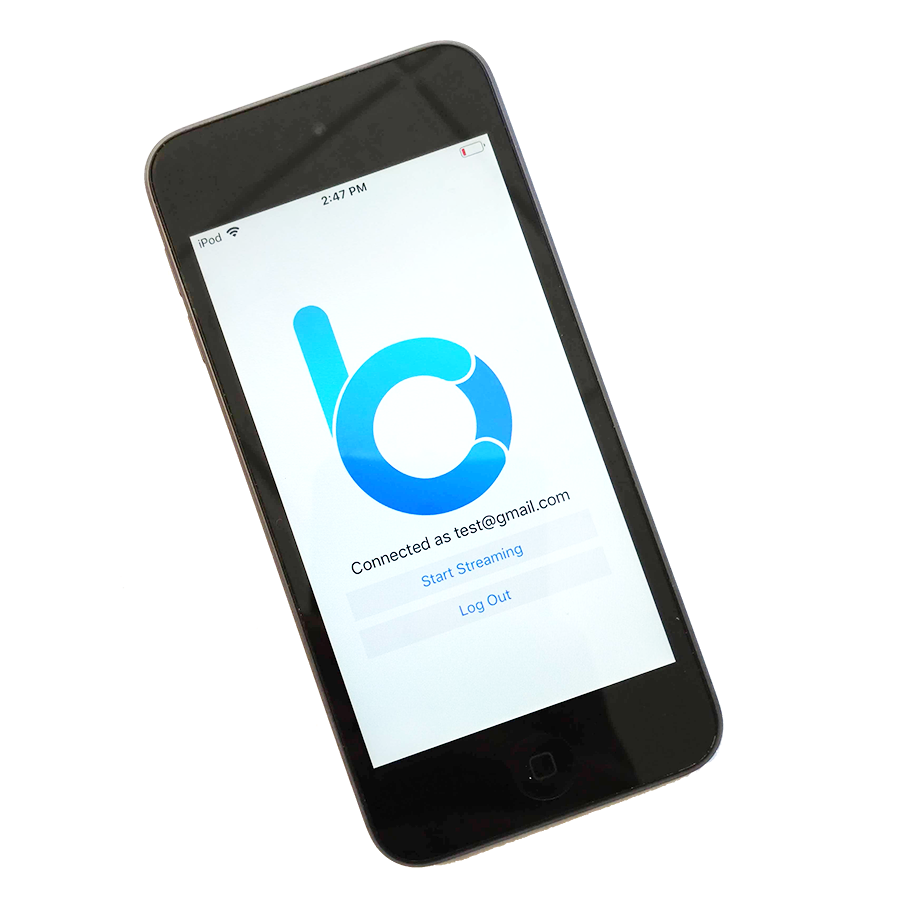
BehaviorCloud is a cloud-based platform for animal behavior research. To get started you will need a BehaviorCloud account.
1) Create an account
Set up an account at BehaviorCloud.
Optionally, if you plan to record video you will need the BehaviorCloud Camera app and a calibration pattern:
2) Get the app
Download the free BehaviorCloud camera app from iTunes or the Play Store onto the device you intend to use for recording video. Android or iOS smartphones, tablets, or iPods are compatible recording devices. You can purchase a video recording bundle, including an iPod and mounting hardware, from our store.
3) Print a calibration pattern
Download the calibration pattern and print it out. Save for later.
Automated Video Tracking
You can analyze animal activity in any maze or cage by recording video with the BehaviorCloud Camera app or by uploading your existing video files. First, we'll walk through how to record video with the app.
Running live trials for video tracking
1) Recording live video with the BehaviorCloud Camera app
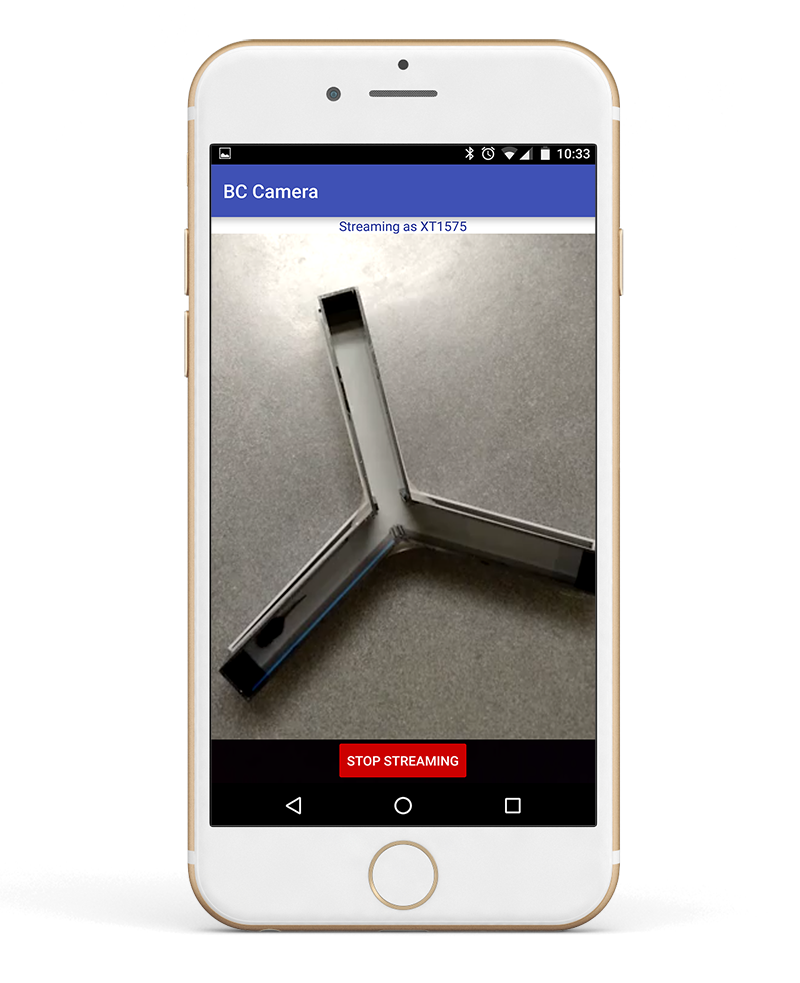
Running trials with the Camera app requires a stable WiFi connection for streaming video and a power source for the video streaming device. Log in to the BehaviorCloud Camera app using the credentials you created above and mount the mobile device above your cage or maze so the desired recording area is in view. The mobile device running the Camera app serves as the video camera - you will need a second mobile device or laptop computer to control your experiment.
Make sure the phone is mounted securely so it will not shift during testing. Smartphone mounts or tripods work well for this purpose.
The ambient lighting in the testing room must be sufficient for the camera to capture clear video. If testing in dim light or darkness is required, then a red light or, depending on particular device specifications, an infrared light source can be used to capture clear video.
Set up the experiment in a low traffic area. Shadows moving across the tracking area may interfere with tracking of the subject or affect behavior of the test subjects.
Streaming works best if the Camera app is positioned to record in landscape orientation - not portrait.
2) Set up a live experiment
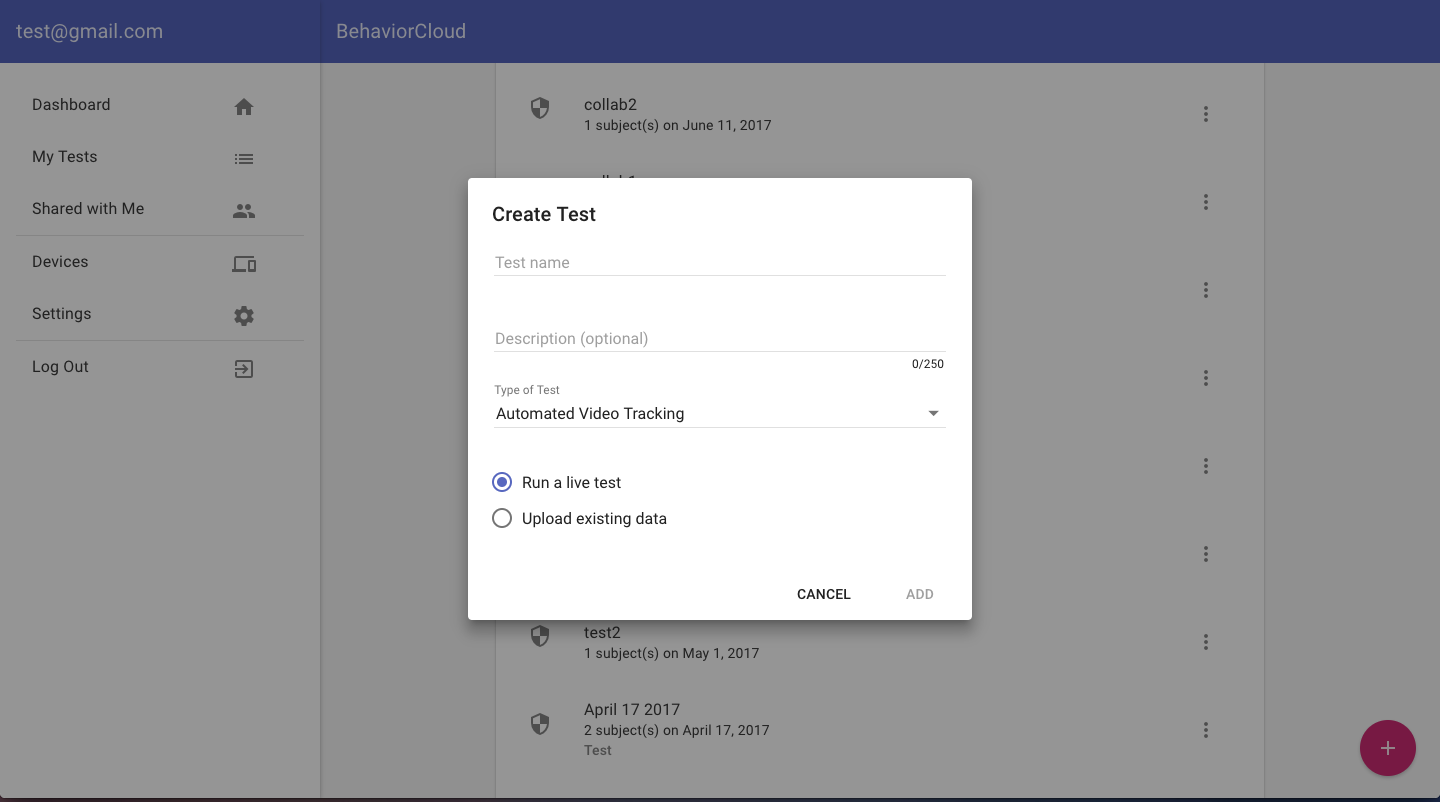
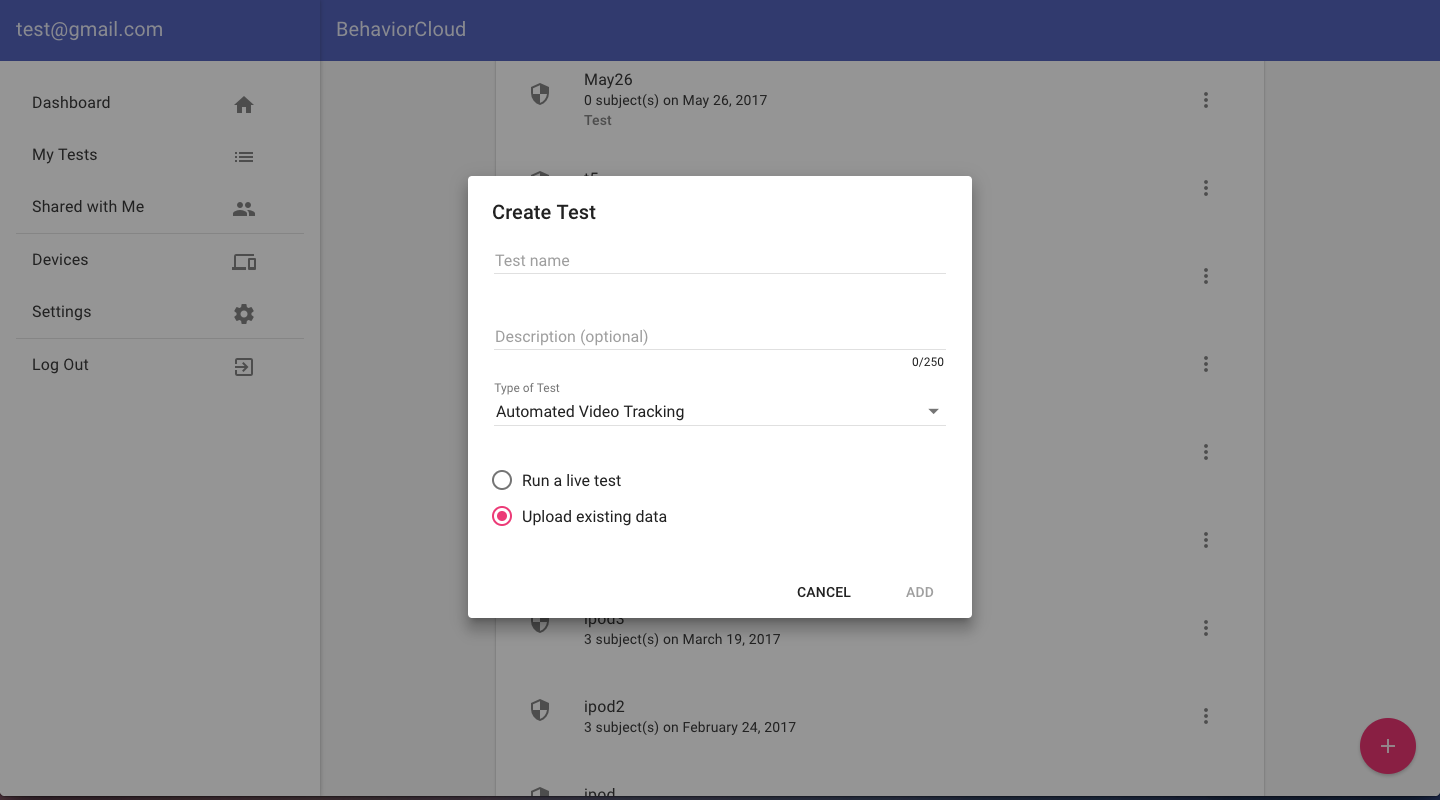
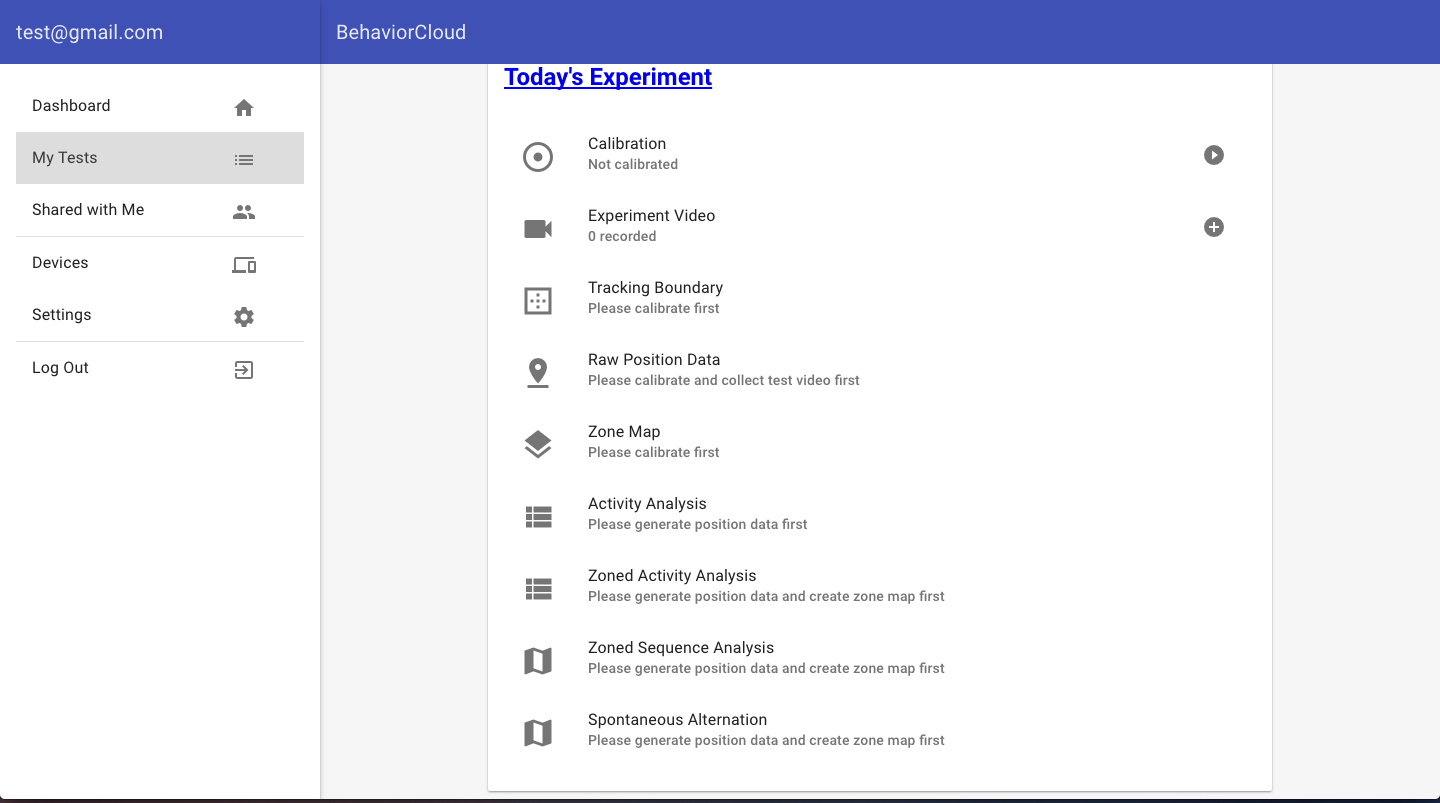
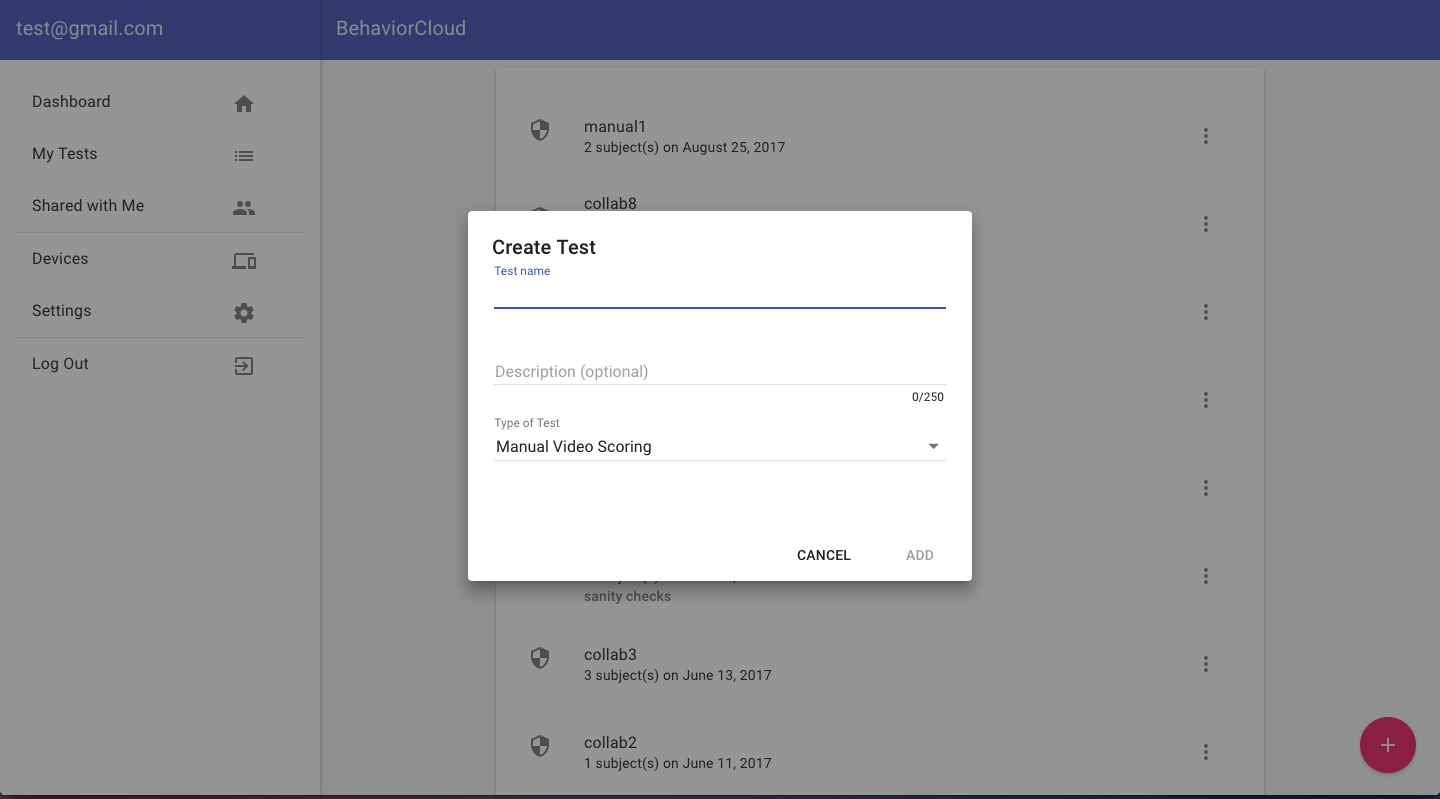
Experiments are controlled through the web browser so you can use a second internet-enabled mobile device or a laptop computer to run your experiment. Just log in to your BehaviorCloud account and click My Tests in the left hand menu. Click the plus sign at the bottom right hand corner of the screen to create a new experiment. Give your experiment a name and an optional description. Select the type of experiment from the drop down menu - in this case, Automated Video Tracking. Choose the option to Run a Live Test. You will be taken to the experiment page where you can collect and analyze data.
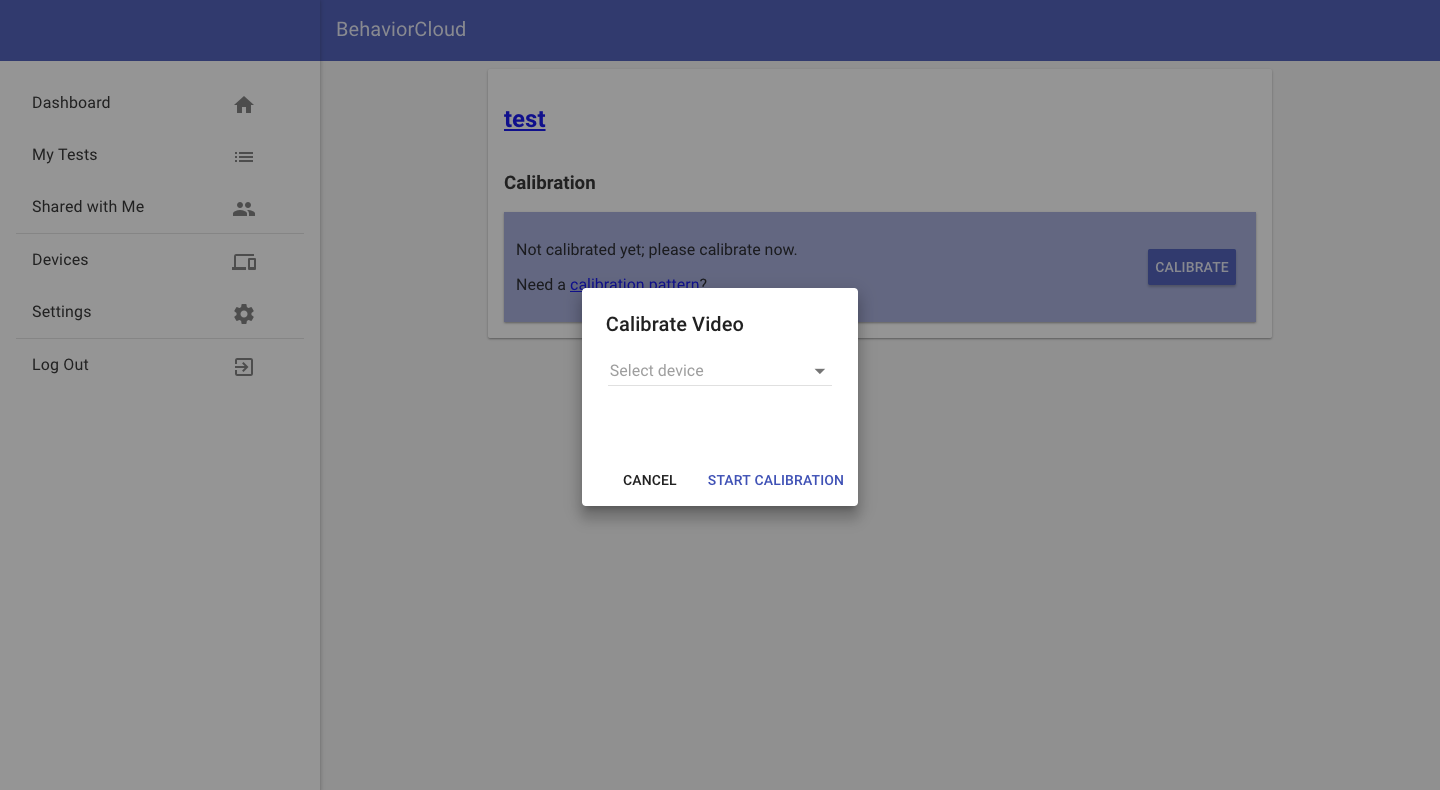
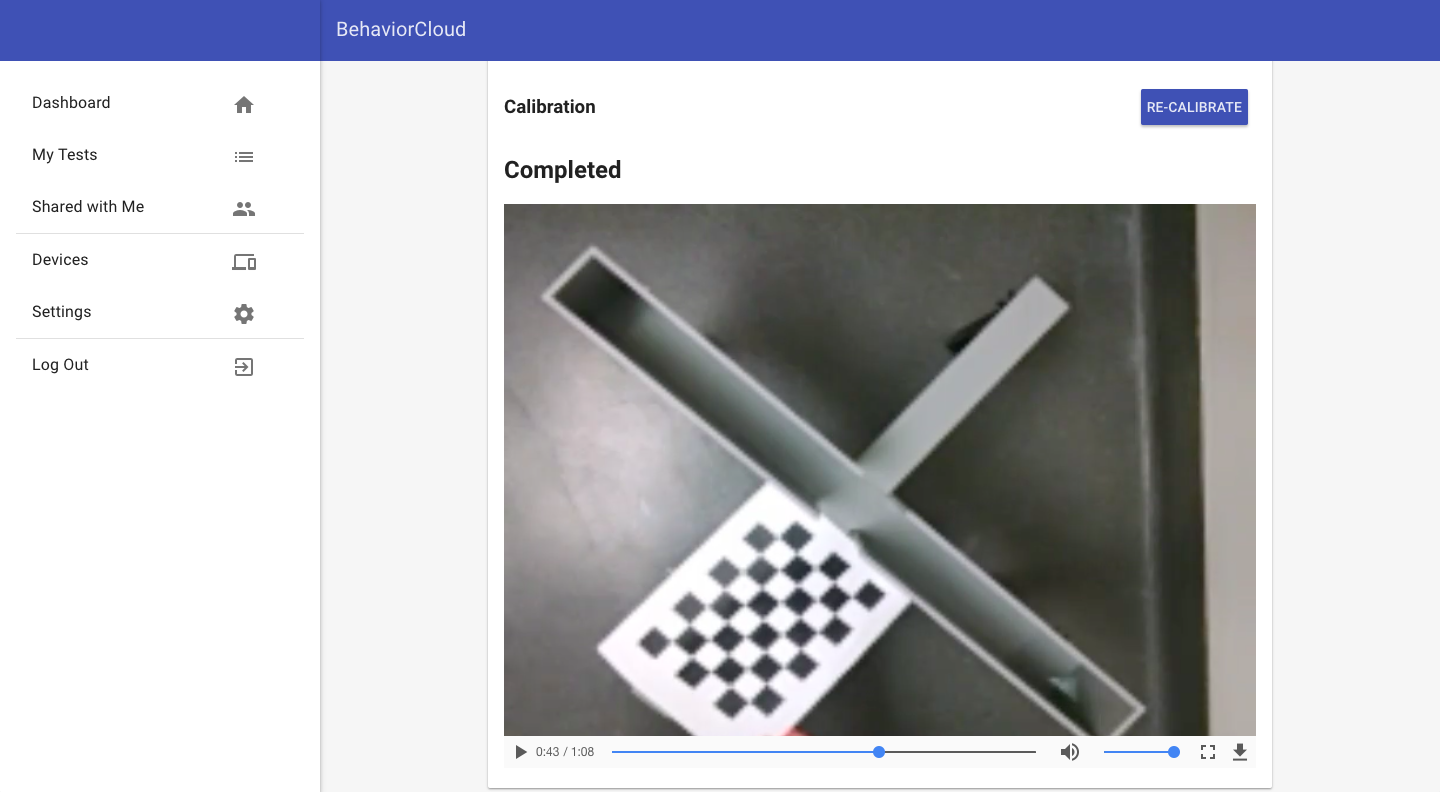
3) Calibrate distance for a live experiment
From your experiment page, click Calibration to initiate distance calibration. Select the name of the mobile device you're using to record video from the drop down menu. You will then see a preview of the video feed. Place the printed calibration pattern (available here) into the maze in full view. From the preview, you will see that BehaviorCloud automatically recognizes the pattern and calculates a distance calibration. When you are satisfied, click next and the distance calibration will be saved and applied to the entire experiment. This measurement is valid for all subsequent trials as long as the camera and the maze remain stationary.
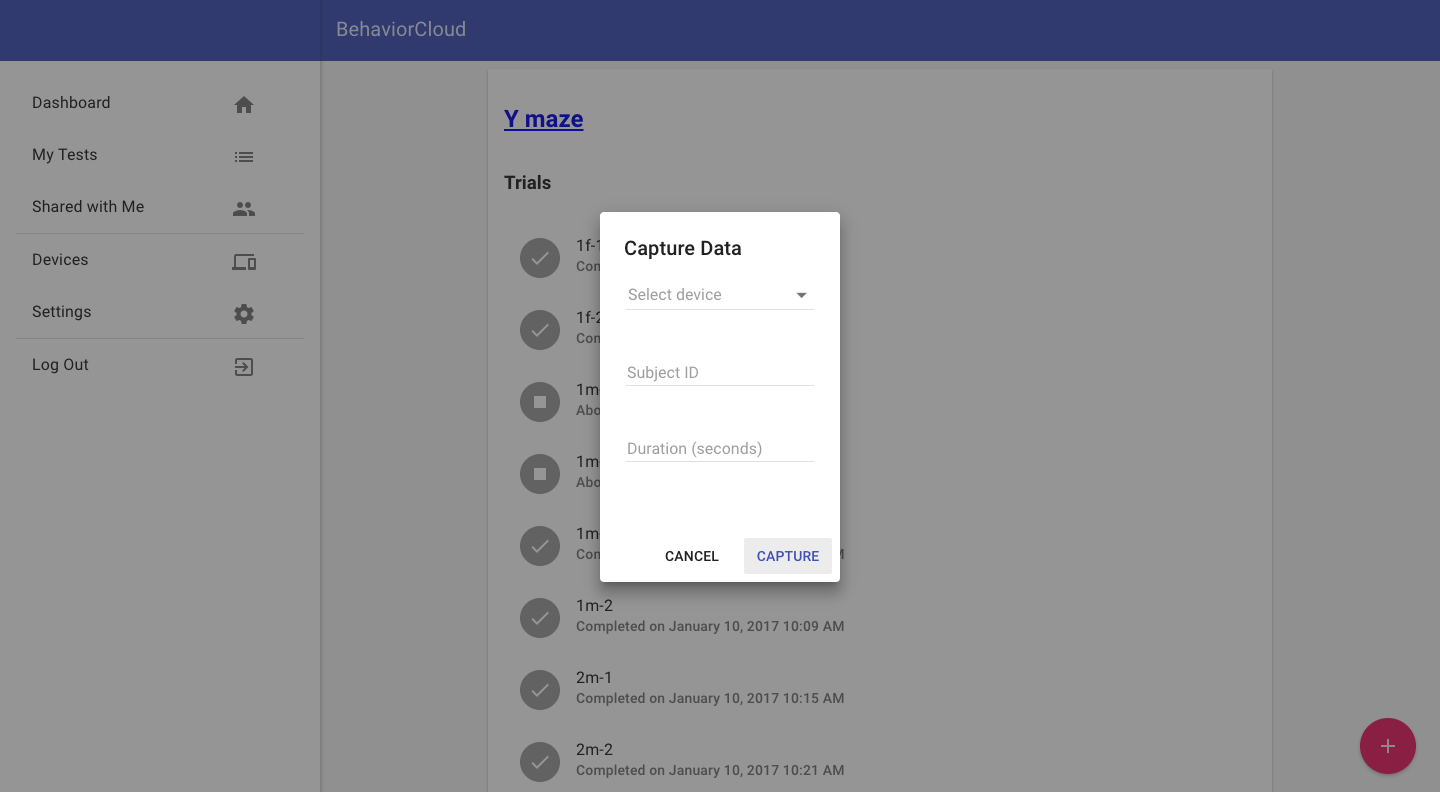
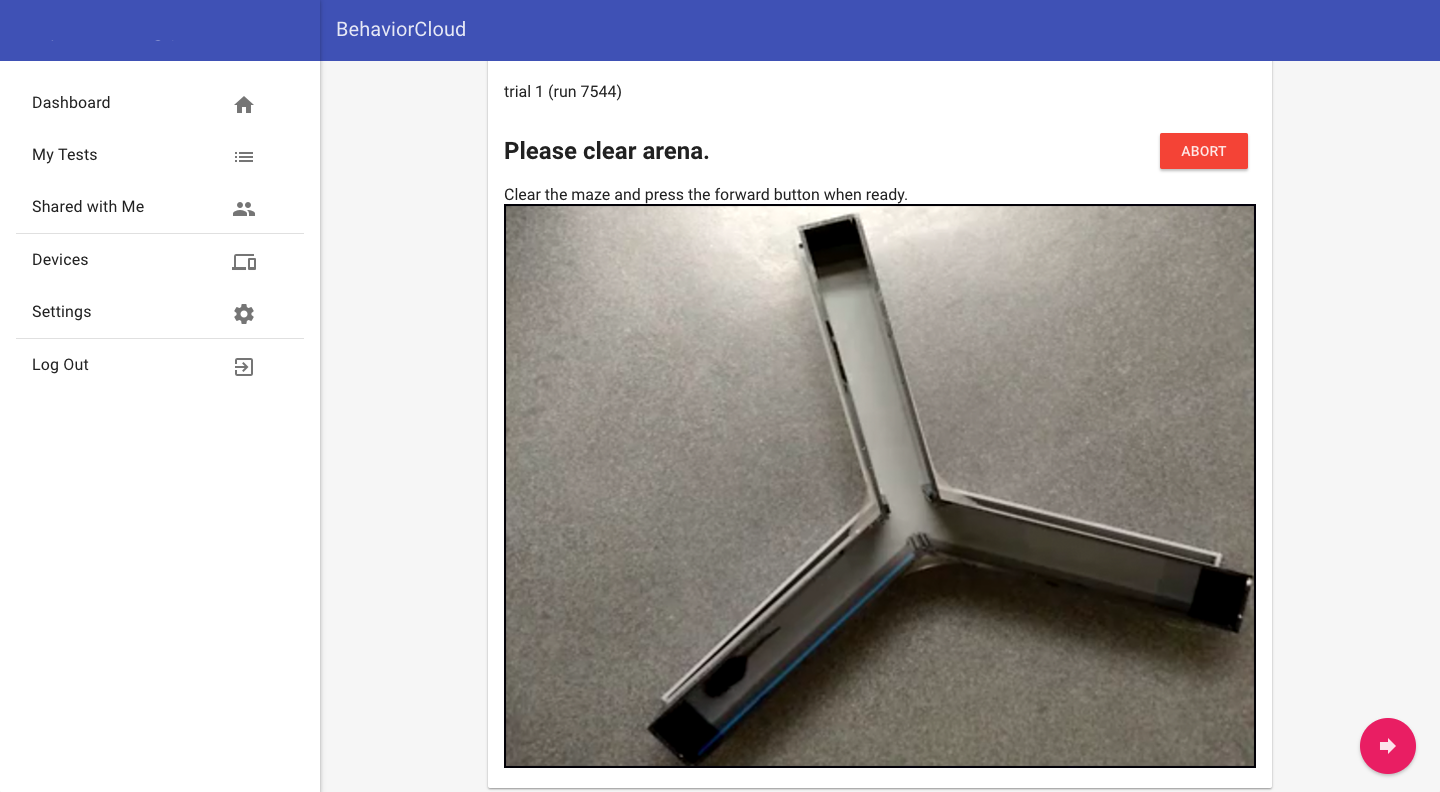
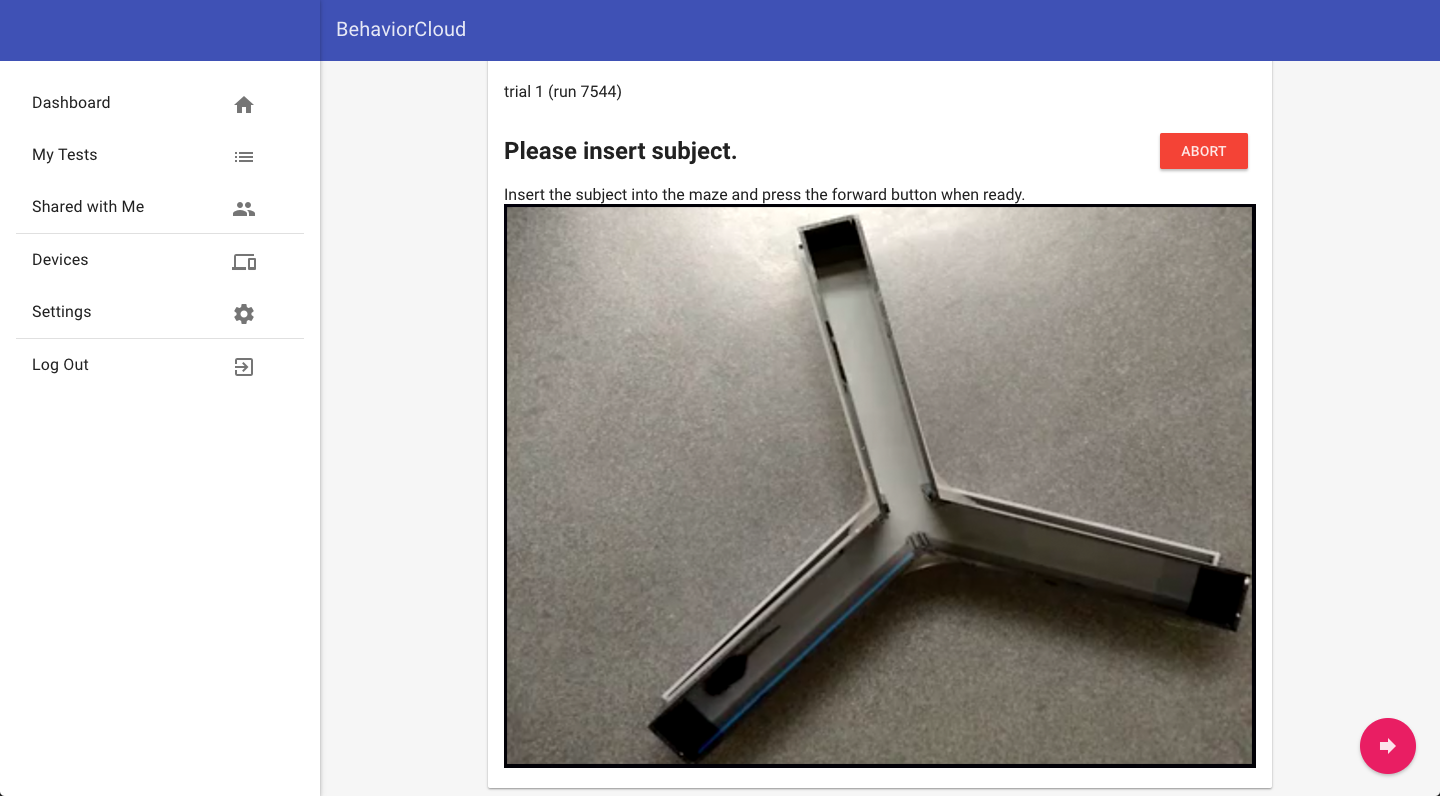
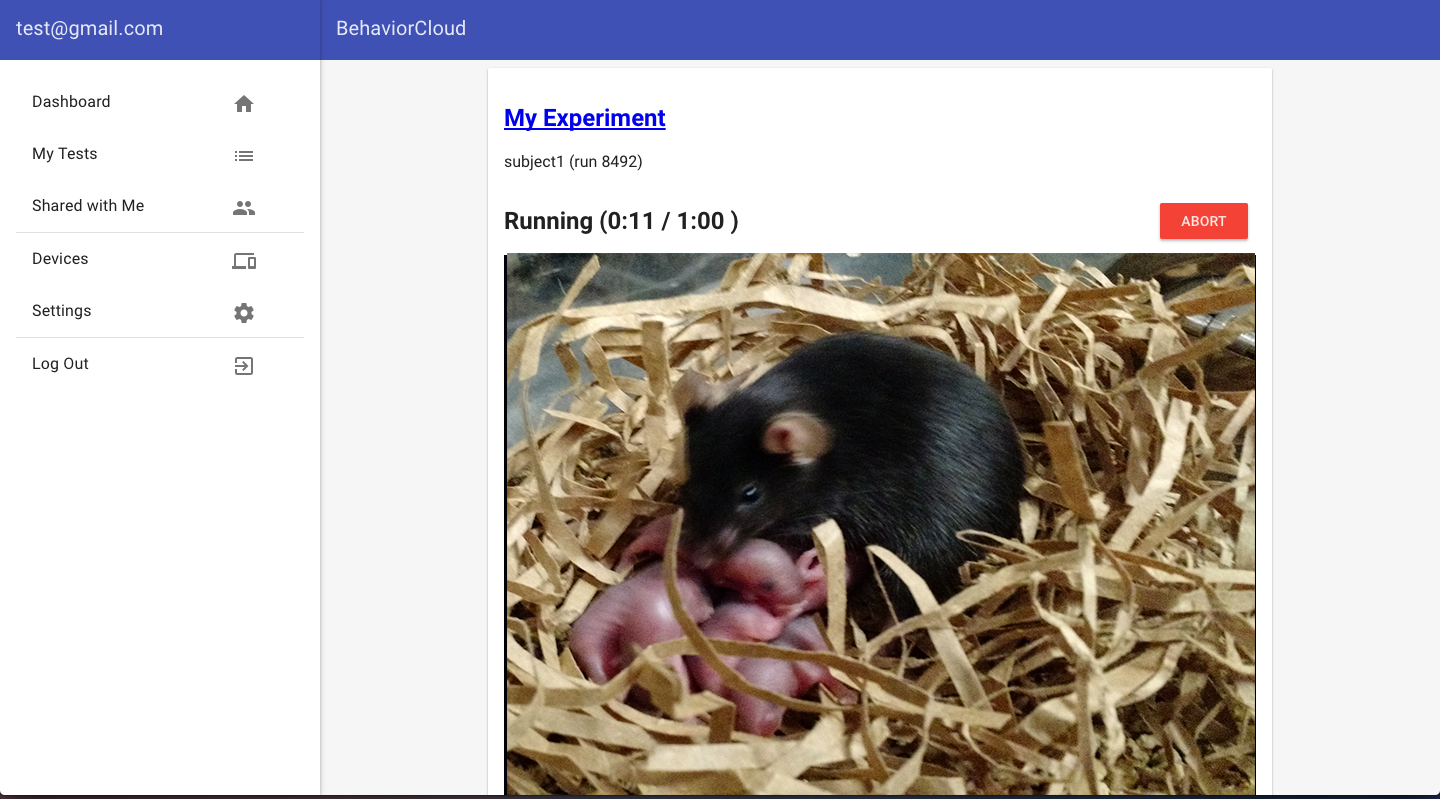
4) Start a live trial
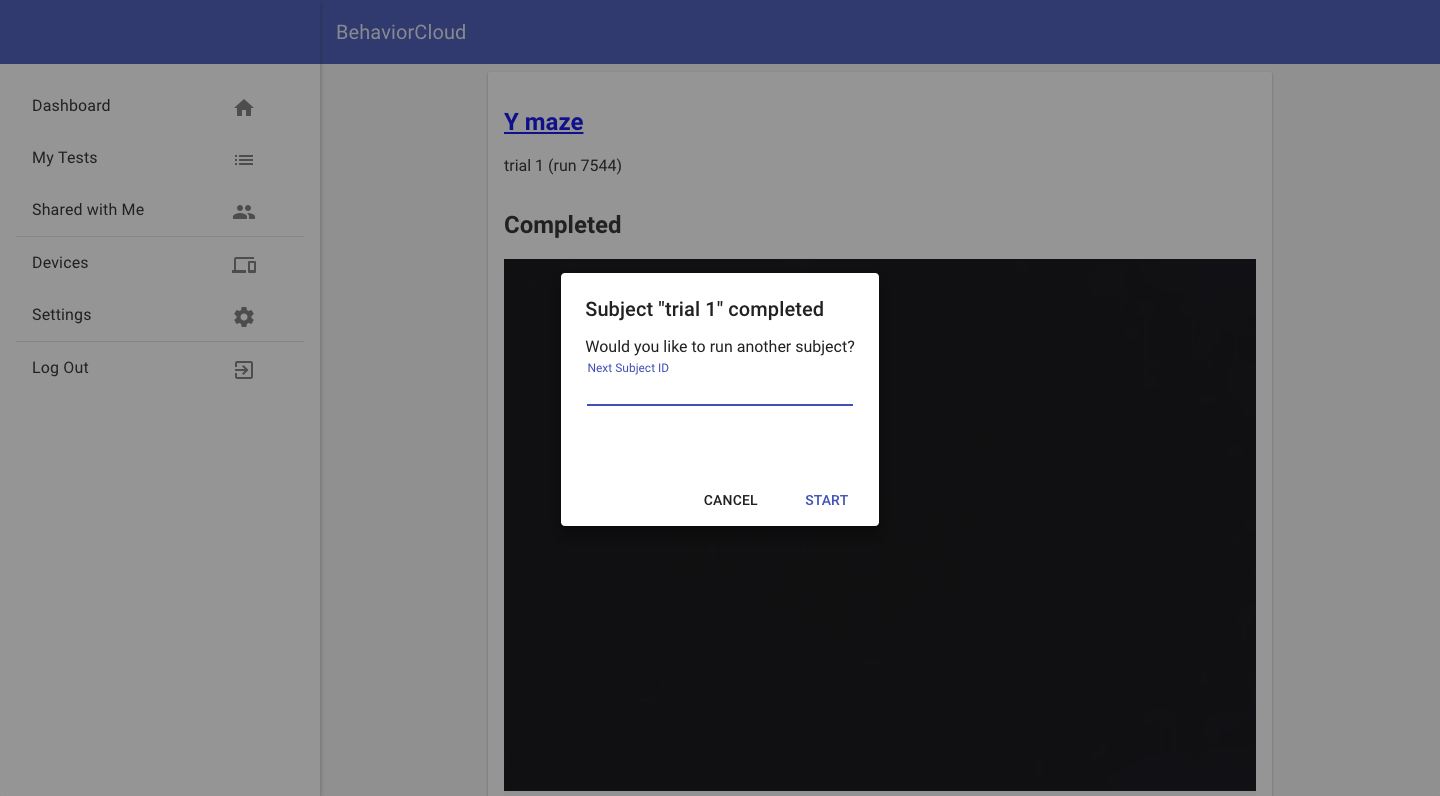
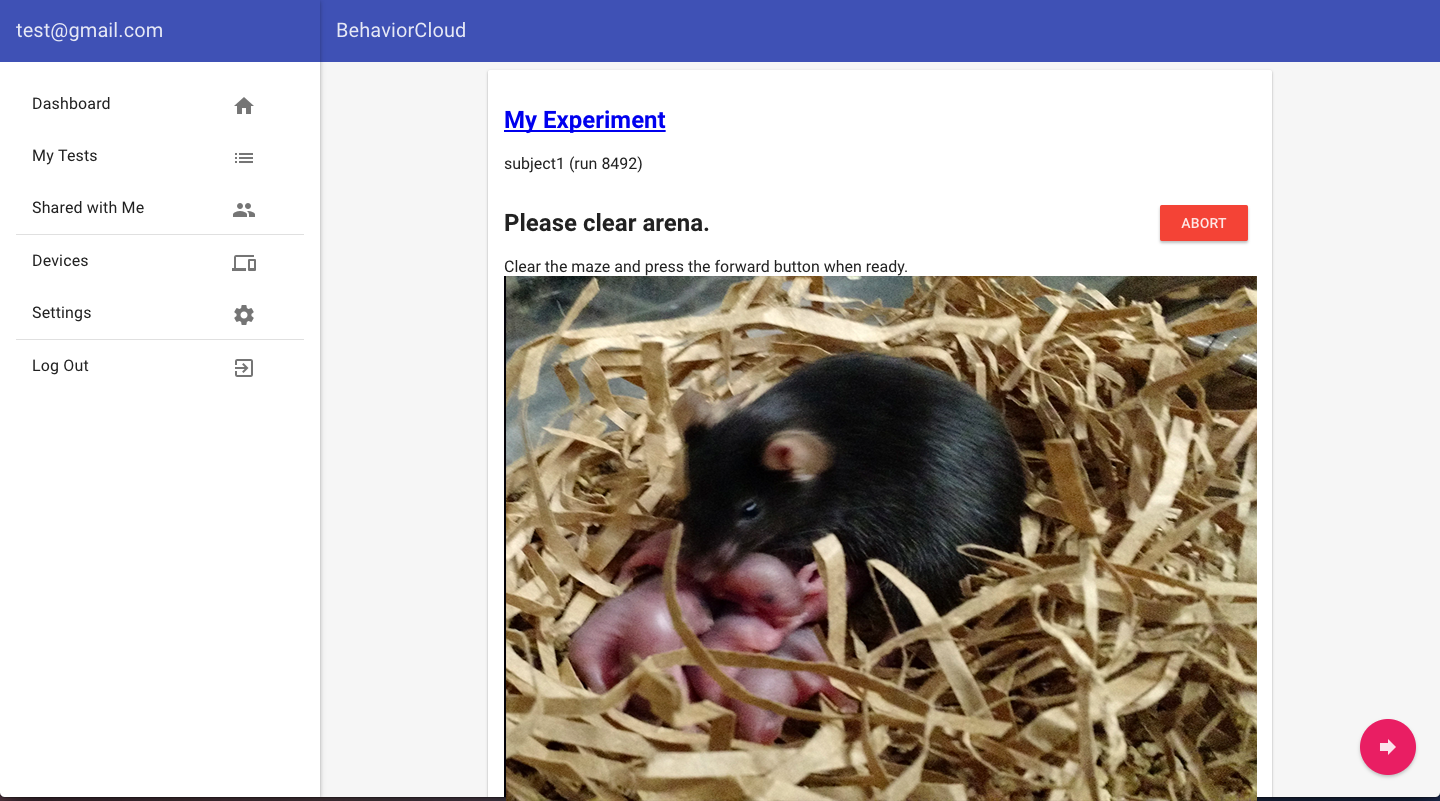
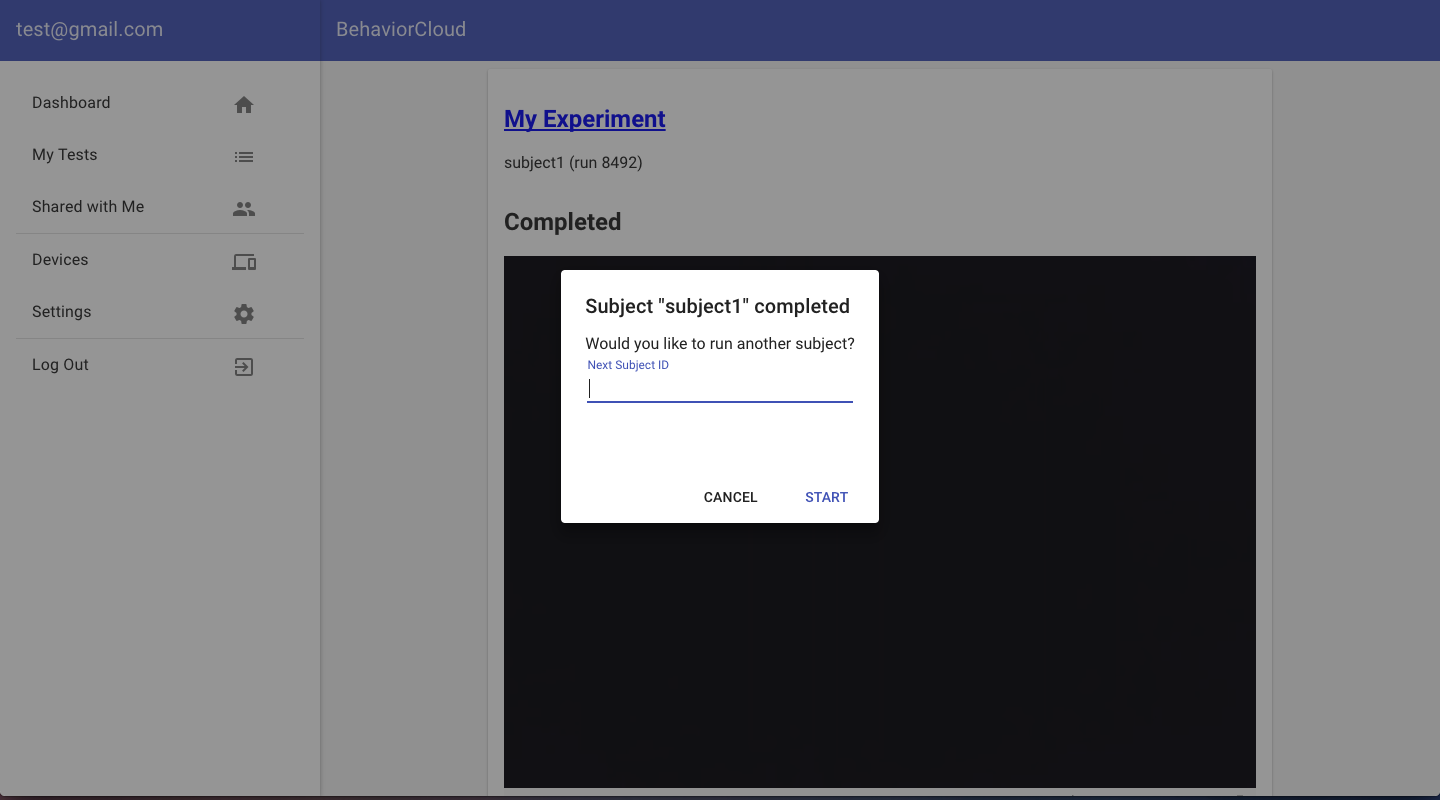
Back in your experiment page, click Experiment Video and then click the plus sign to add a new trial. Select the desired recording device from the drop down menu, enter the Subject ID, and enter the trial length in seconds. BehaviorCloud will prompt you to clear the arena (i.e., no mice, people, or other movement in the video) and then click the arrow to advance to the next screen. Then BehaviorCloud will prompt you to insert the subject. Click the arrow to begin the trial. Recording begins and when time is up, the trial will automatically end and you will be prompted to enter the next subject. Record as many trials as desired.
All trials saved in an experiment will use the same distance calibration, so if you plan to test subjects over several days and anticipate moving the maze and/or recording device during that time, it is recommended that you create a new experiment for each day with a new calibration to get the most accurate distance measures.
Uploading files for video tracking
If you have existing video recorded elsewhere, you can upload those files to your BehaviorCloud account for video tracking analysis. Most major video formats are supported, but 4k, HD, or very large files can take time to upload. Feel free to get your uploads started and then log out and come back later. Now we'll walk through how to upload video files, manually calibrate data, and set the start time for tracking analysis.
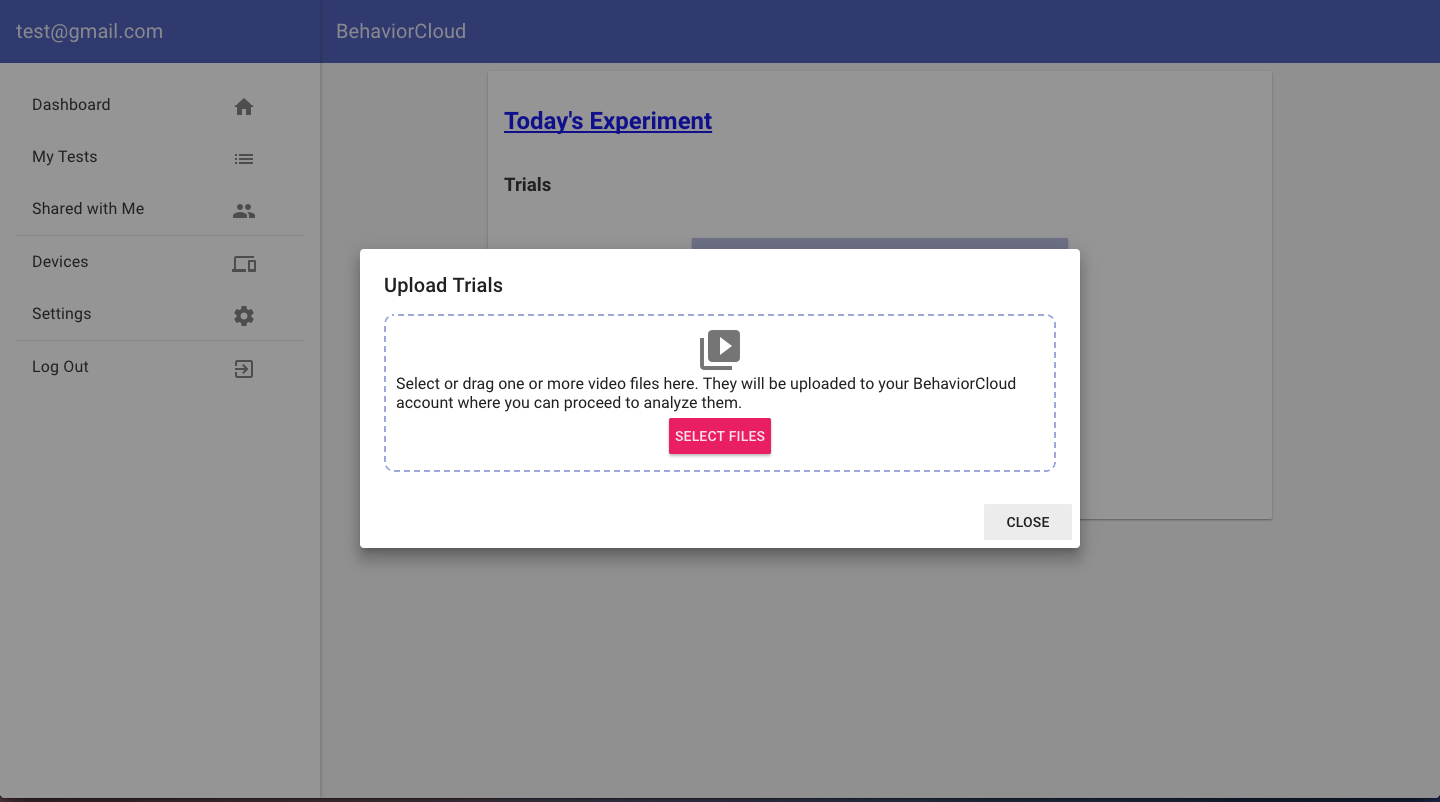
1) Upload video files
Log in to your BehaviorCloud account and click My Tests in the left hand menu. Click the plus sign at the bottom right hand corner of the screen to create a new experiment. Give your experiment a name and an optional description. Select the type of experiment from the drop down menu - in this case, Automated Video Tracking. Choose the option to Upload Existing Data. You will be taken to the experiment page where you can upload videos.
Click Experiment Video to upload files. You can select files individually or drag and drop many files.
If you have large video files or HD video, uploading them may take time. To speed up the upload time, compress your videos before uploading. Or feel free to get your uploads started and then log out and check back later.
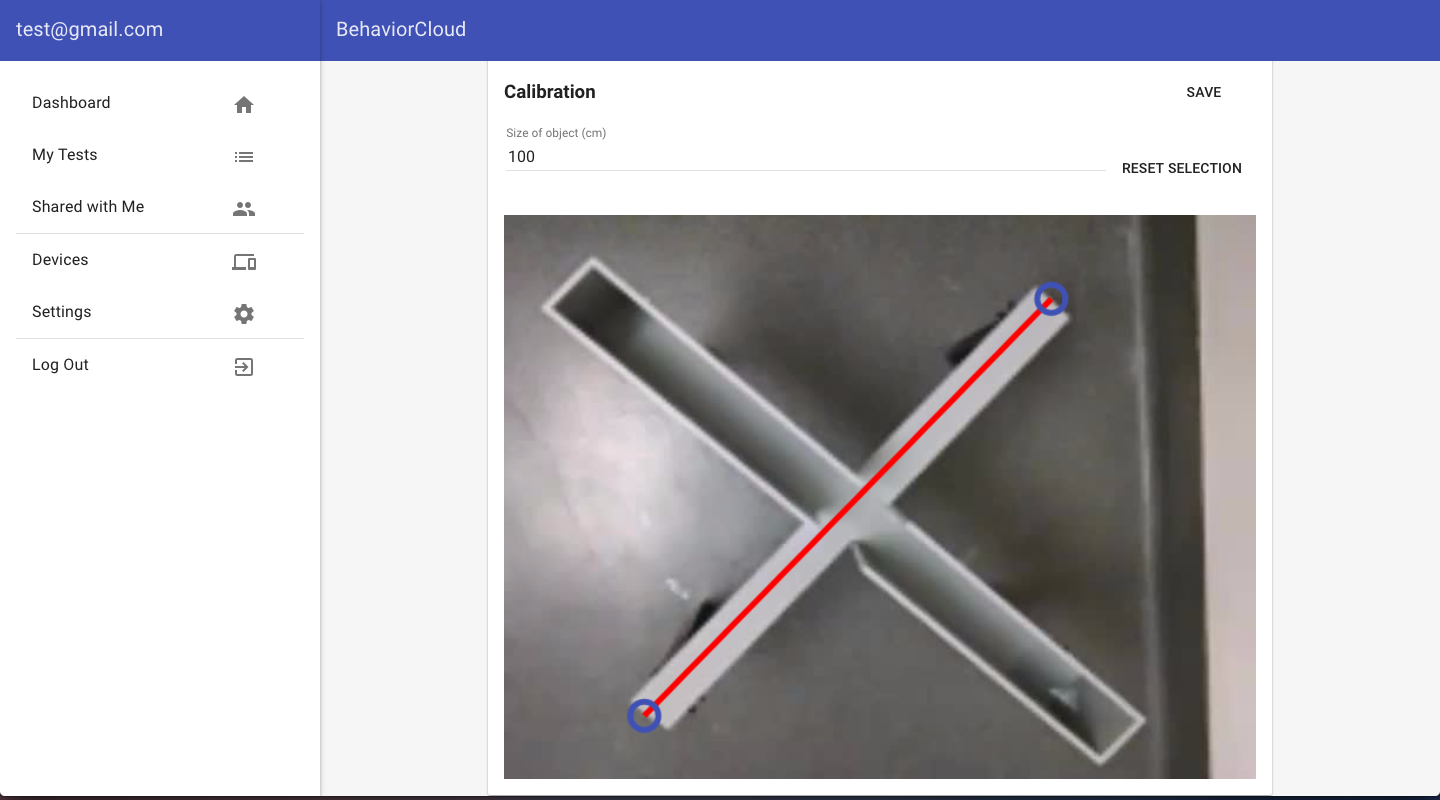
2) Calibrate distance for uploaded video
Manually calibrate distance by clicking Calibrate in the Experiment dashboard. You will see a preview image of your video. Use the provided tool to draw a line of known length on the image. Enter the known length of that line in centimeters into the space provided above the image. Click Save.
3) Setting timestamps for uploaded video
You’ll also need to set two timestamps for each video file to specify a background image, as well the start time of the trial. Click on one of your uploaded videos and you will see a tool for specifying timestamps. First, use the top slider to set a timestamp for the background image when the arena is clear. This is the static reference image to be used as the background for video tracking, so it should be a video frame free of any animals, people, or other objects or movement. Click Set Cleared Timestamp. Second, use the bottom slider to set a timestamp for when the animal is inserted and tracking should begin. Click Set Inserted Timestamp. Click Save and Finalize. Do the same for all of your videos.
![]()
Analyzing Video Tracking data
Data can be analyzed anywhere by logging in to your BehaviorCloud account. Follow the analysis workflow in your experiment page.
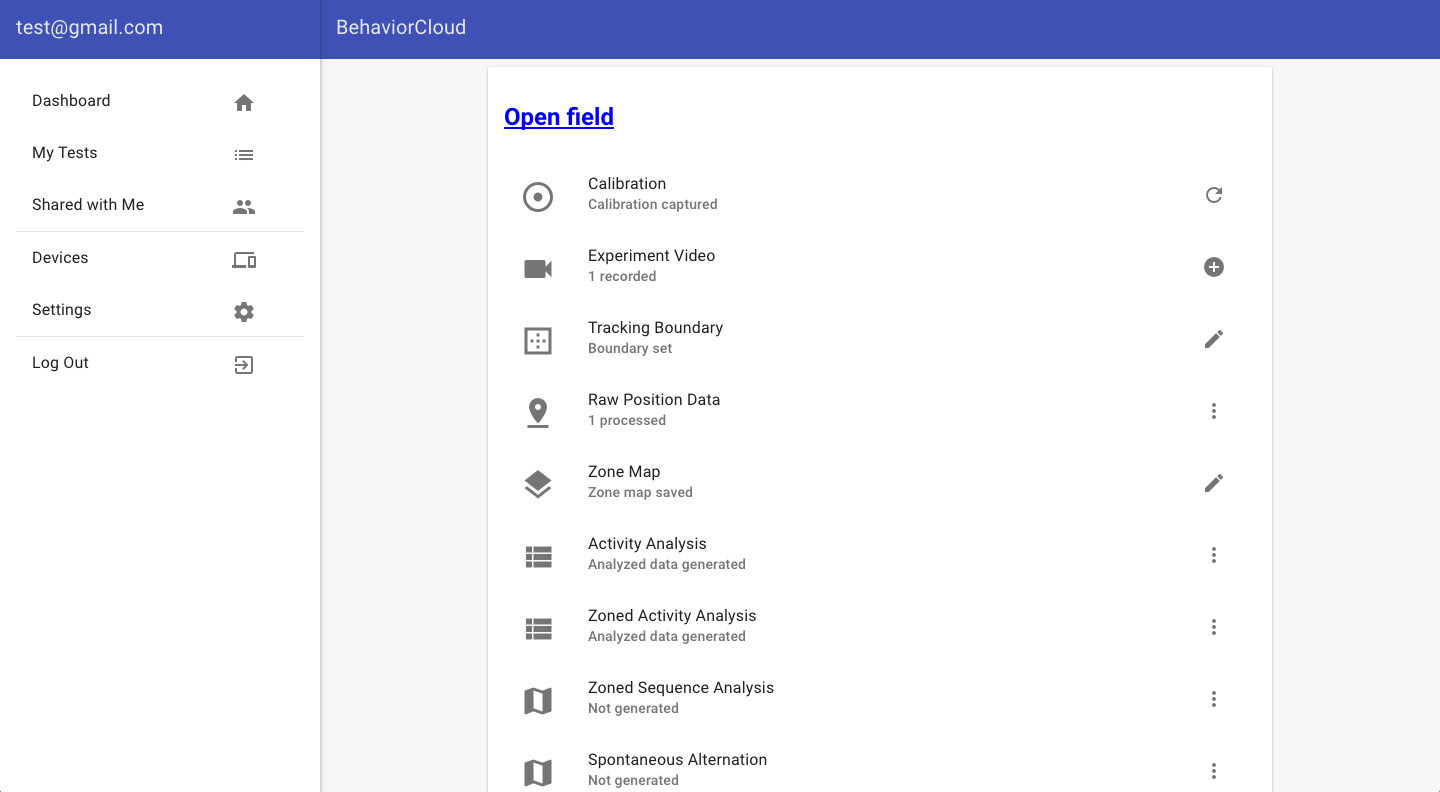
1) Play back raw video From your experiment page, click Experiment Video to play back video or download raw video files as .mp4 files.
2) Generate raw XY data
From your experiment page, click Tracking Boundary to set the area to be tracked. Use the shape tools to cover the maze area and click Save. Multiple shapes and overlapping shapes are acceptable. Only objects within this area will be tracked for analysis. This step is optional but recommended, especially if movement from the user or other sources is present in the video.
![]()
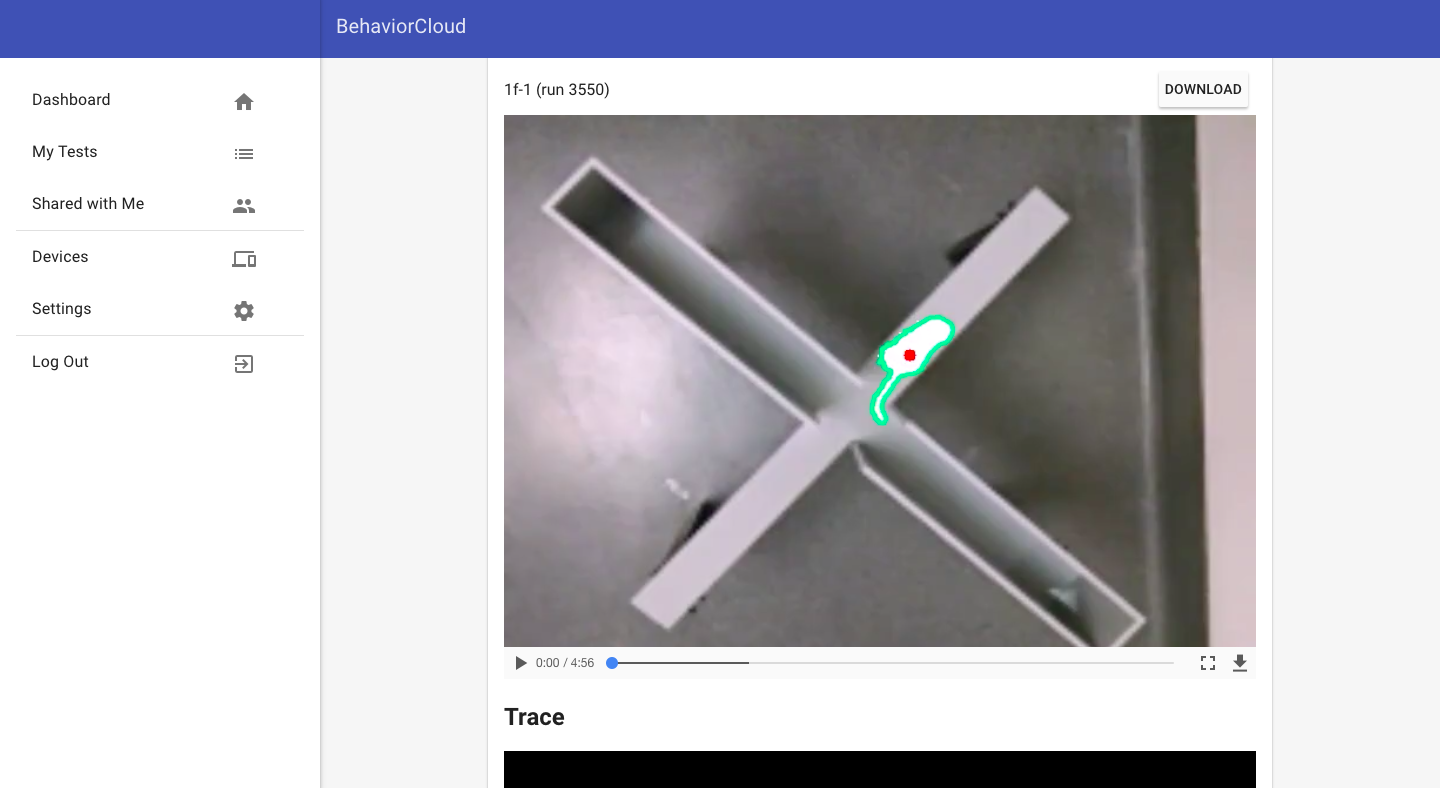
After the tracking boundary is set, go to Raw Position Data on your experiment page to generate raw tracked behavior data for all subjects. This analysis could take several minutes per subject, so you can feel free to log out and come back later if you are analyzing a large batch. Analysis will continue to run even if you are logged out. An indicator next to each subject shows the status of the analysis. Once analysis is finished and a check mark is displayed, you can click on individual subjects to view and/or download the tracked video data and a trace of the animal's path.

3) Draw zones
From your experiment page, select Zone Map to draw zones using the provided shape tools. Enter names for each zone in the space provided under the preview. When finished, click Save in the top right corner of the screen. This step is optional depending on your intended use. If you don't need zoned data, you can skip this step.

Zones will be named in your exported data file according to the names you indicate in this step.
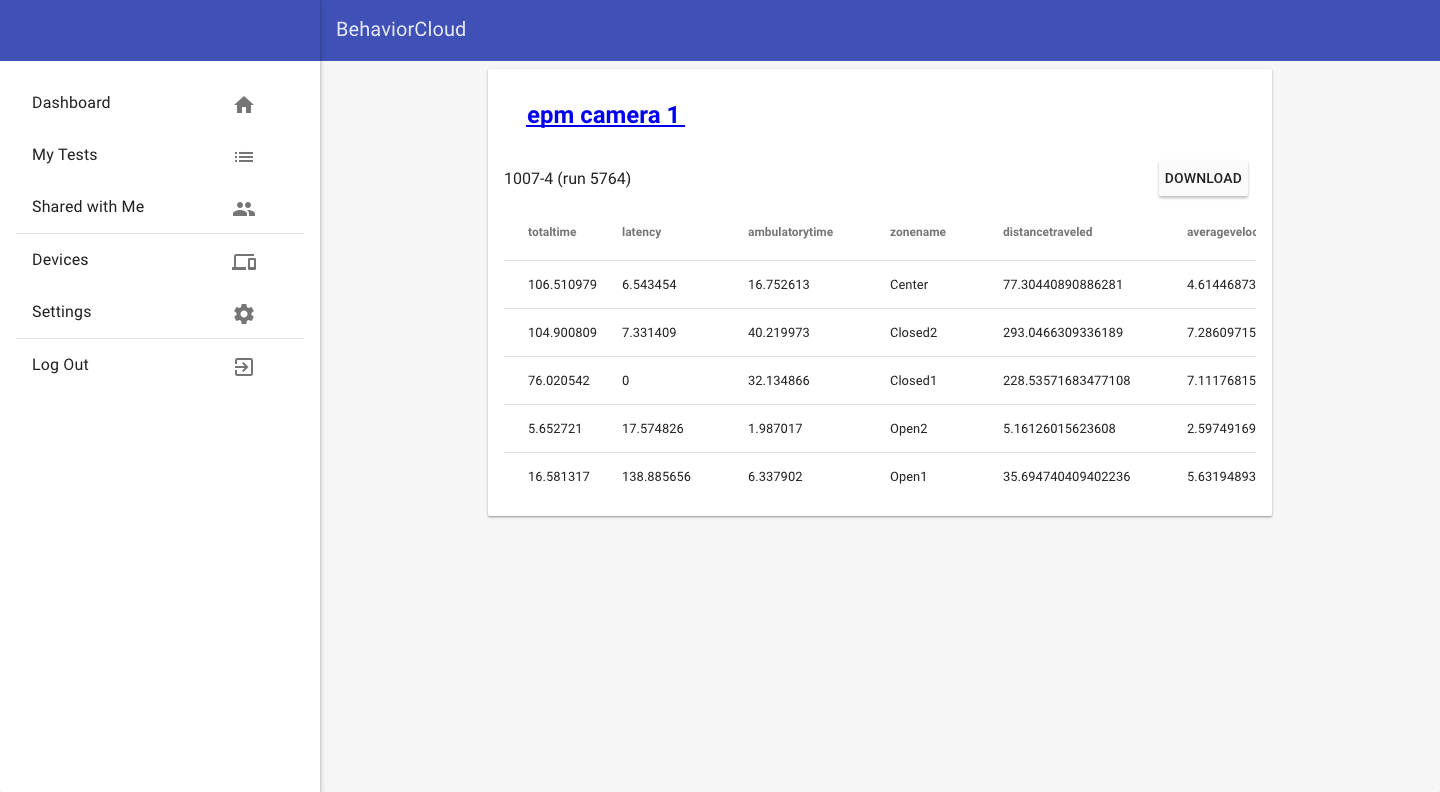
4) Generate analyzed data files
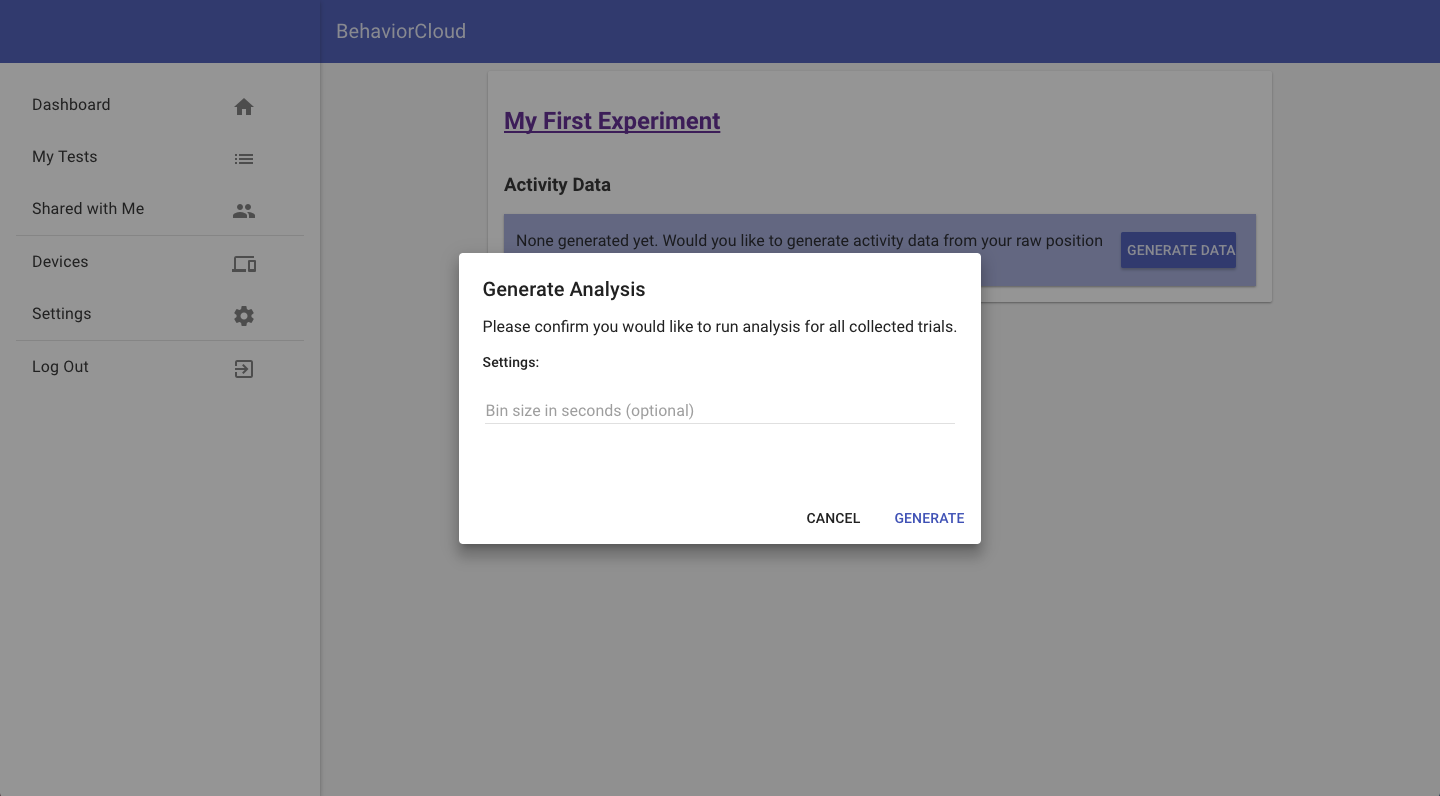
BehaviorCloud generates variables including total distance, total time, ambulatory time, resting time, latency, average velocity, zone entries, and spontaneous alternation. From your experiment page, select any of the four options for data analysis. Activity Analysis generates unzoned activity data. Zoned Activity Analysis generates activity data broken into zones, according to the zones specified above. Zoned Sequence Analysis lists the zones entered in order of entry. Spontaneous Alternation calculates percent spontaneous alternation in three-arm mazes like Y-maze or T-maze. Before generating analyzed data, you will be given the option to segment the trial into time bins. Enter the bin size in seconds if desired, or leave the field blank to have the entire trial analyzed as a whole. You can analyze both ways if desired - just analyze and download your .csv file and then re-analyze to get a second .csv file. After analyzed data is generated, you can preview your data in the browser or download your data as a .csv file and directly import into your data visualization program or statistical analysis software of choice.
Remember that you can view the tracked video files under the Raw Position Data tab of your experiment page. Raw position data must be generated prior to generating any data files.
Manual Scoring
To run experiments that require manual scoring of behaviors, you can either record live video with the Camera app or upload existing video files. We'll walk through both options, starting with recording live video.
Recording live video for manual scoring
Set up the Camera app and start streaming video as described above for video tracking. Create a new experiment, selecting Manual Video Scoring from the drop down menu for experiment type. You will be taken to your experiment dashboard.
1) Record video
Click Experiment Video and then click the add icon at the bottom right of the screen to set up video recording for a new subject. You will be prompted to select the video streaming device, enter the subject ID, and enter the recording duration. Similar to recording trials for automated video tracking, you will be asked to clear the arena (not necessary for manual observation) and insert the subject. Click the arrow to advance through these steps and begin recording.


The trial will run for the specified time and then end automatically. You will be prompted to enter information for the next subject.
Uploading video for manual scoring
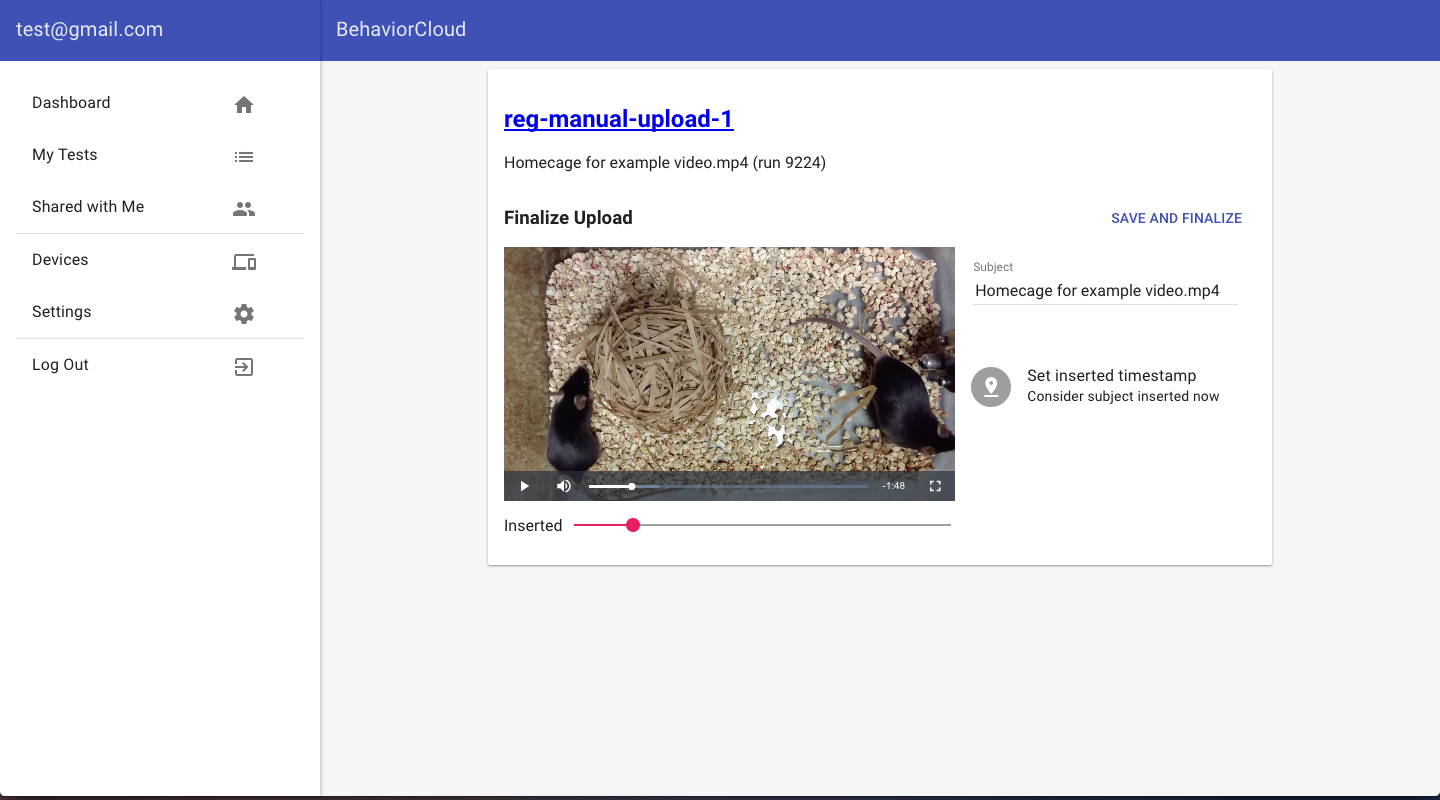
If you have existing videos you would like to manually score, simply upload them to your BehaviorCloud account and specify a timestamp for the beginning of the experiment.
1) Upload video and set a timestamp
Log in to your BehaviorCloud account and click My Tests in the left hand menu. Click the plus sign at the bottom right hand corner of the screen to create a new experiment. Give your experiment a name and an optional description. Select the type of experiment from the drop down menu - in this case, Manual Scoring. Choose the option to Upload Existing Data. You will be taken to the experiment page where you can upload videos by clicking on Experiment Video.
For each video, set a timestamp for the time you would like to start observing. Click on an uploaded video file and use the provided slider tool to set the place in the video where you would like to begin analyzing. Click Set Timestamp and then click Save and Finalize.
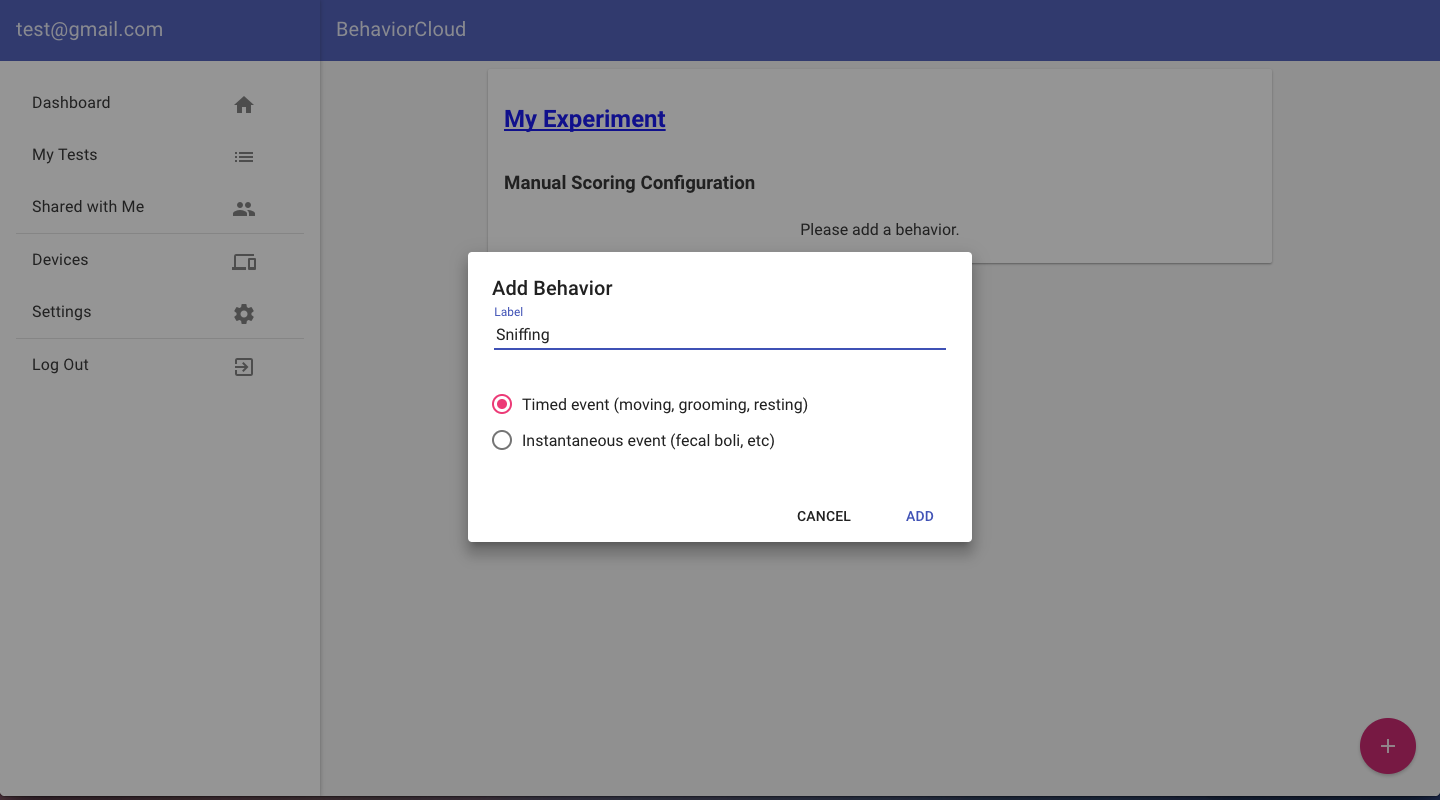
Set-up manual behavior scoring
In your experiment dashboard, click Manual Scoring Configuration to set up the behaviors to be scored. Add behaviors one at a time by clicking the add icon at the bottom right, entering a label for the behavior, and selecting whether the event is timed or instantaneous. Timed events are those behaviors that have a duration, like walking or eating. Instantaneous events are those behaviors that are counted, like fecal boli.
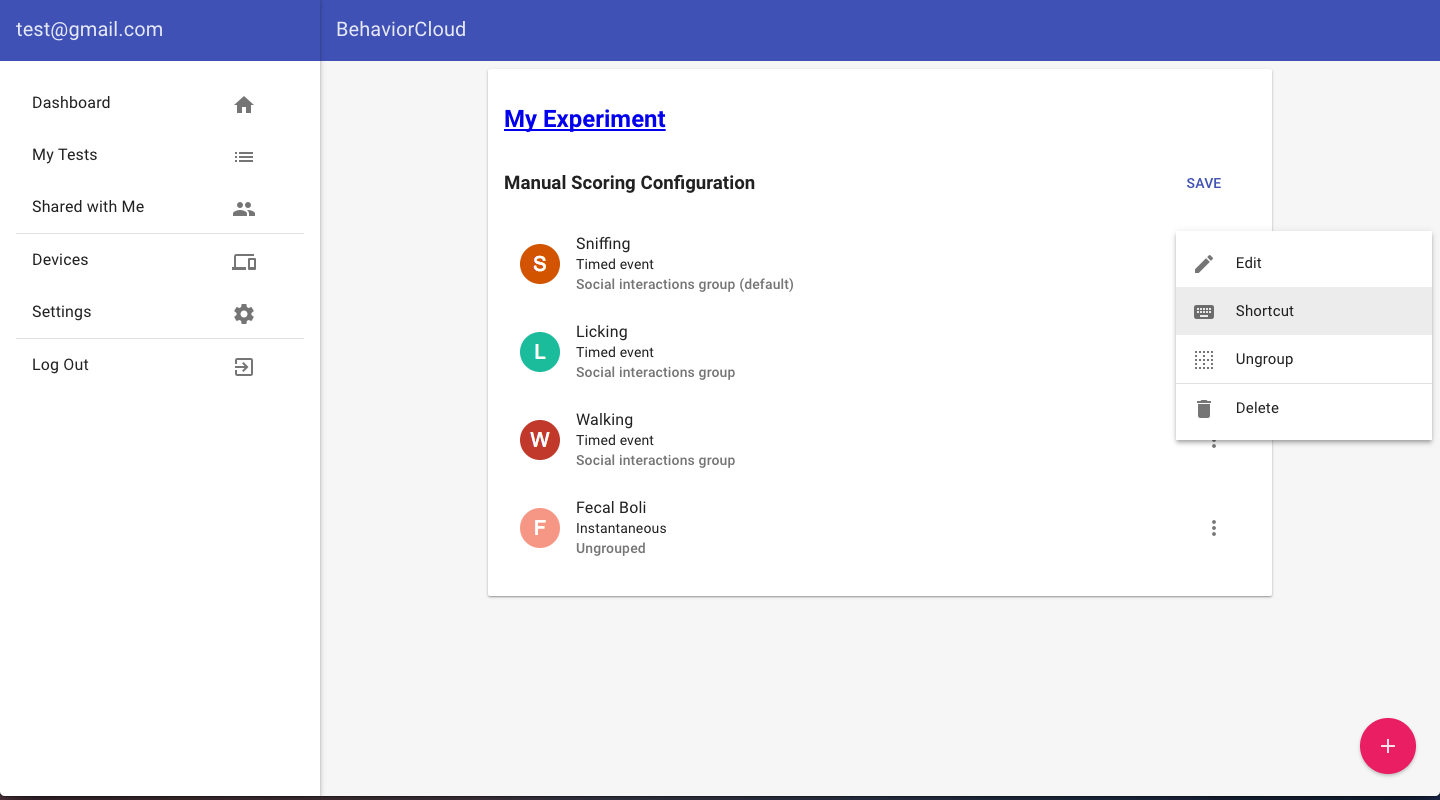
After entering the behaviors to be scored, specify mutually exclusive behaviors by "grouping" them. Click the menu icon to the right of a behavior and select Group. Enter a group name and then similarly assign all of the relevant individual behaviors to that group.
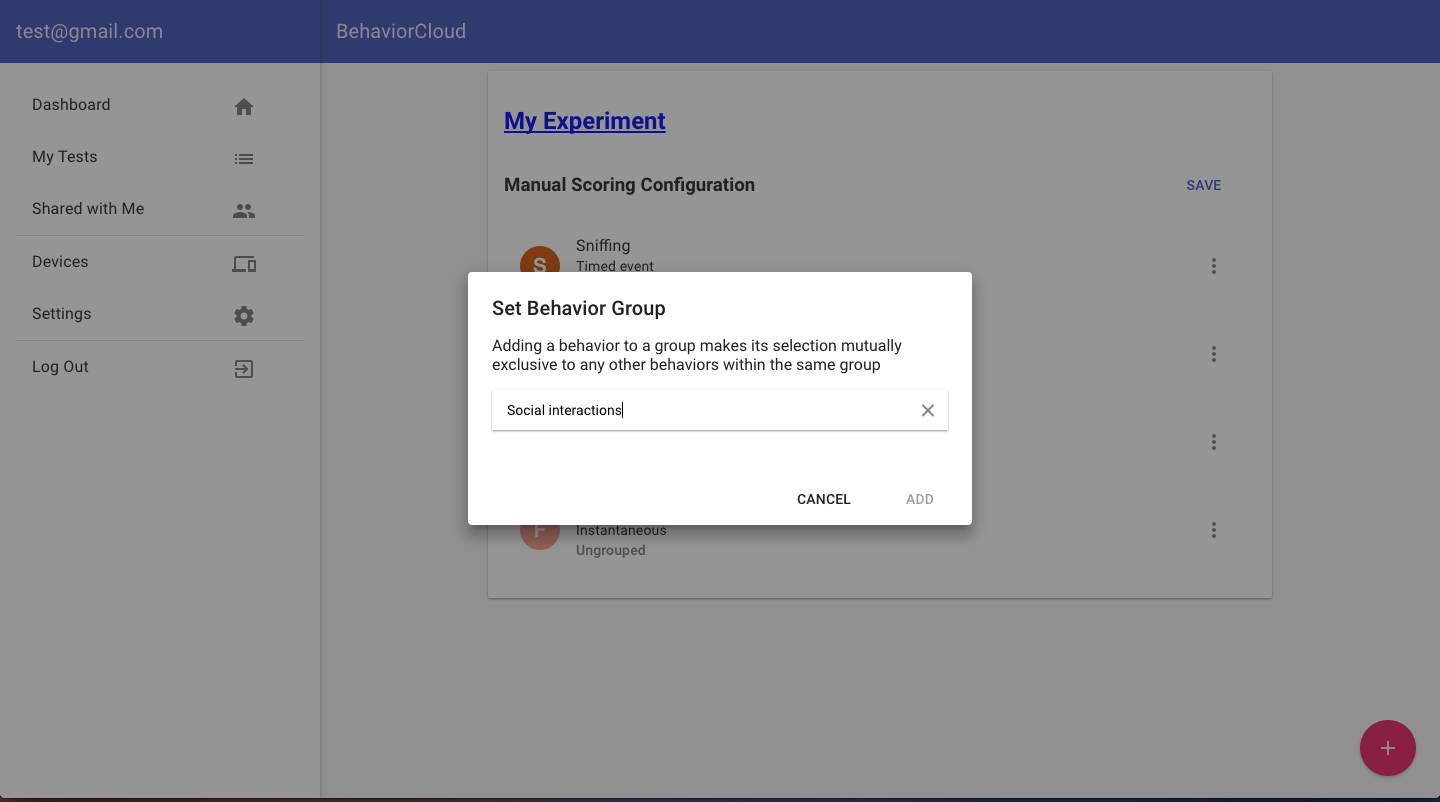
You can ungroup behaviors at any time using the same menu to the right of each behavior. BehaviorCloud automatically assigns a keyboard shortcut to each behavior for easy scoring, but you can also customize the keyboard shortcut from this menu or edit/delete behaviors. You can also specify the default starting behavior.
Observe and score video
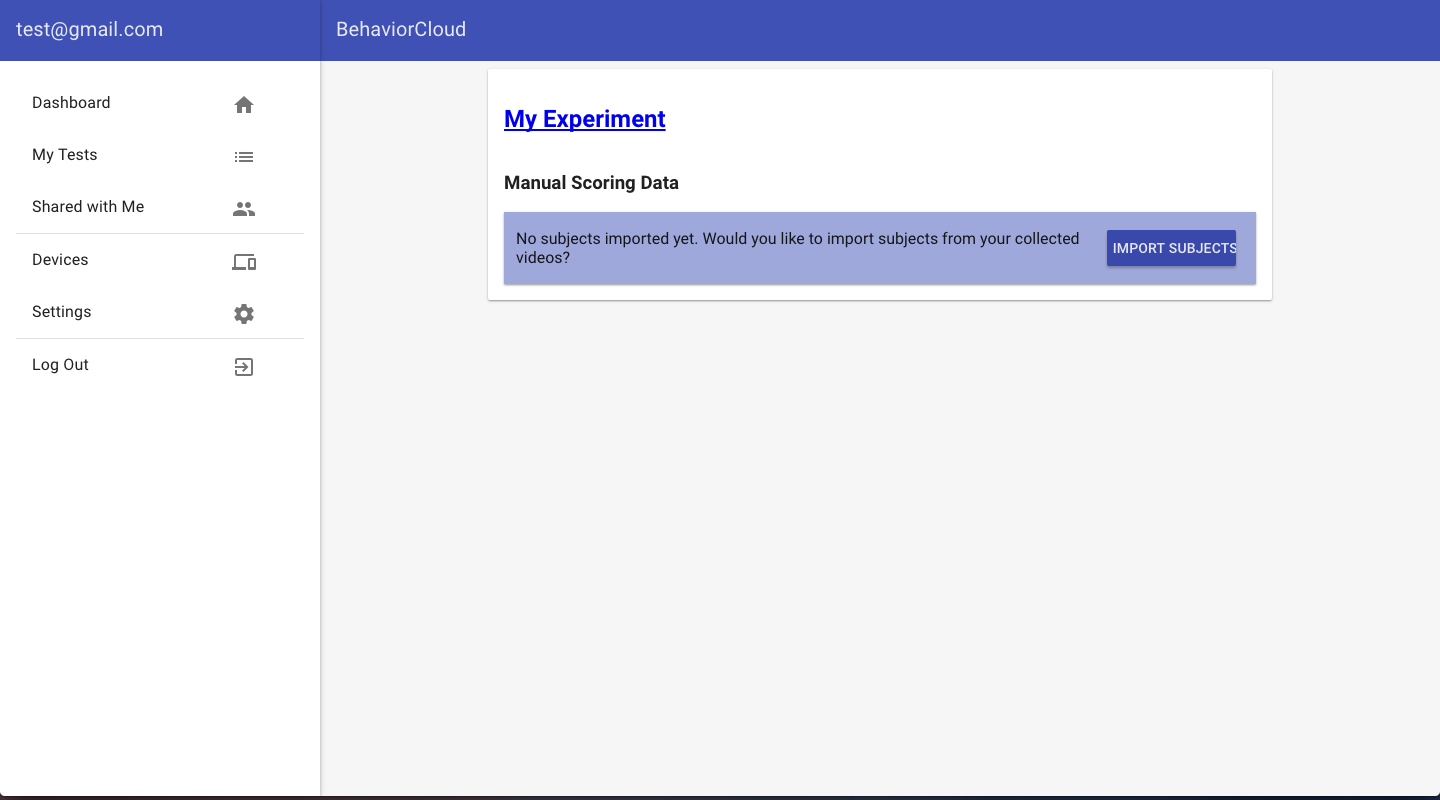
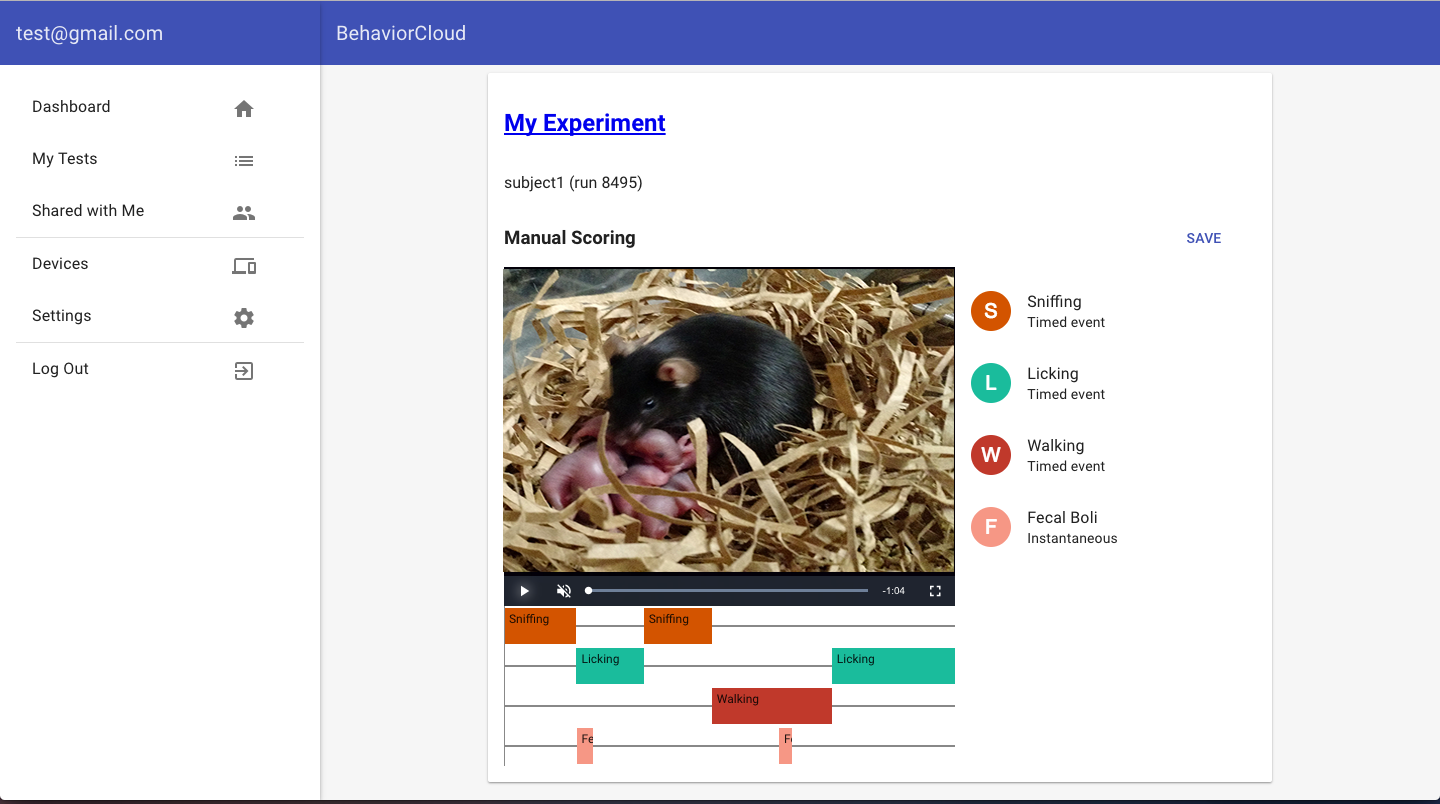
From the experiment dashboard, select Manual Scoring Data to watch and score videos. The first time you visit this page, click Import Subjects to pull the videos you collected into the workspace. Then click on a subject and playback the video. Score behaviors by using the appropriate keyboard shortcut or by clicking a behavior from the list. A timeline of behaviors will appear under the video. You can click behaviors from the timeline to delete or edit as needed.
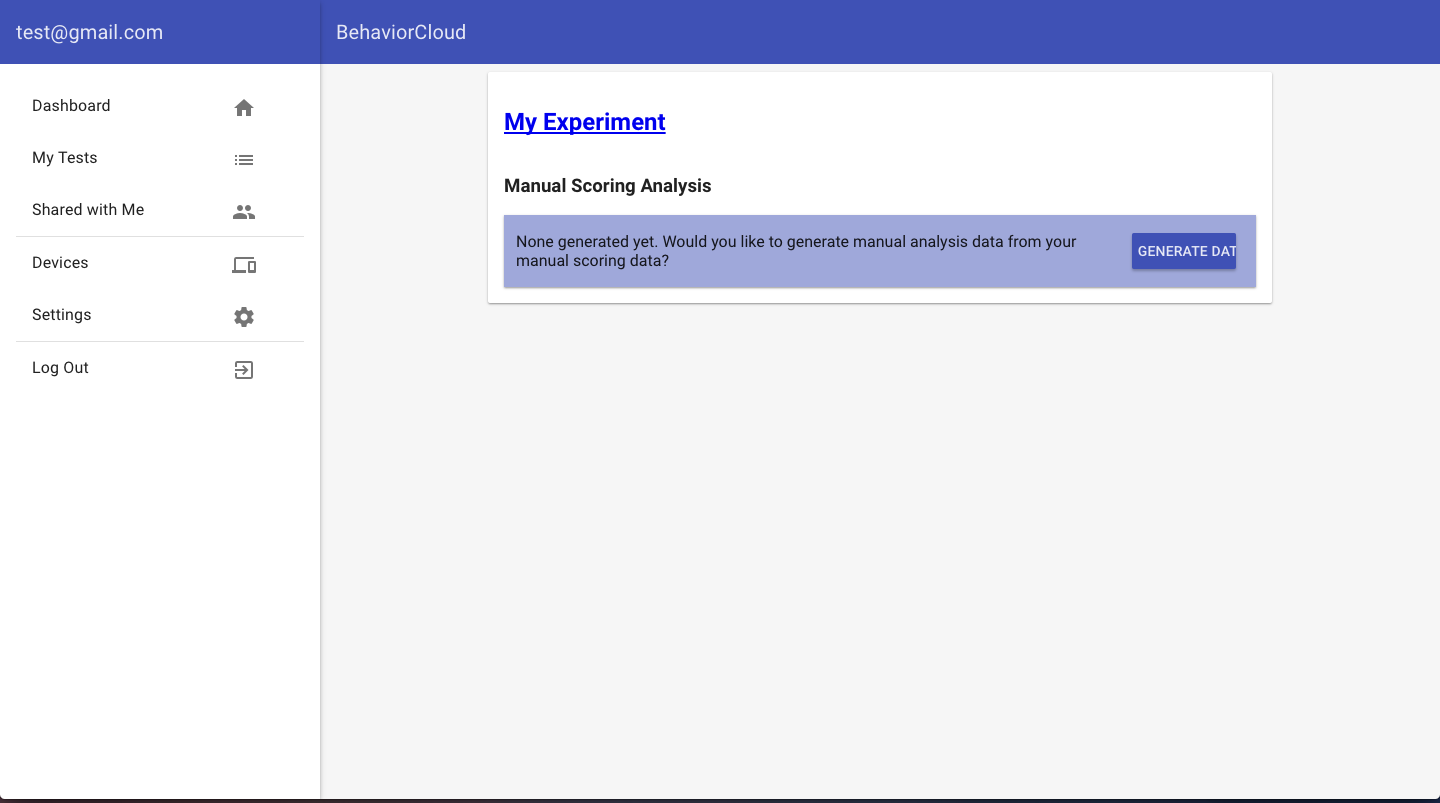
Generate analyzed data from manual observations
After scoring all of the videos, return to the experiment dashboard and click Manual Scoring Analysis. Click Generate Data to initiate analysis. A checkmark will appear by each subject as analysis finishes.
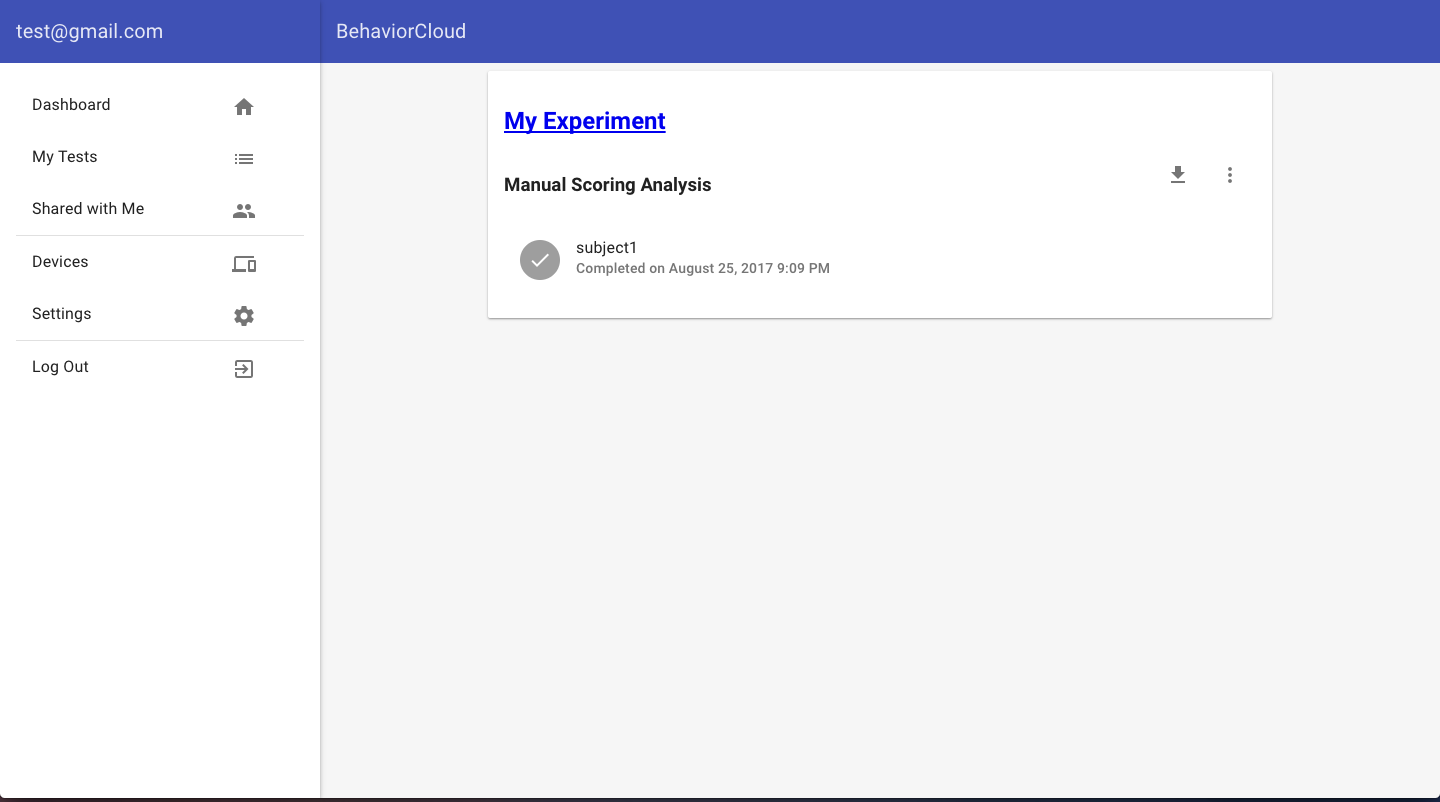
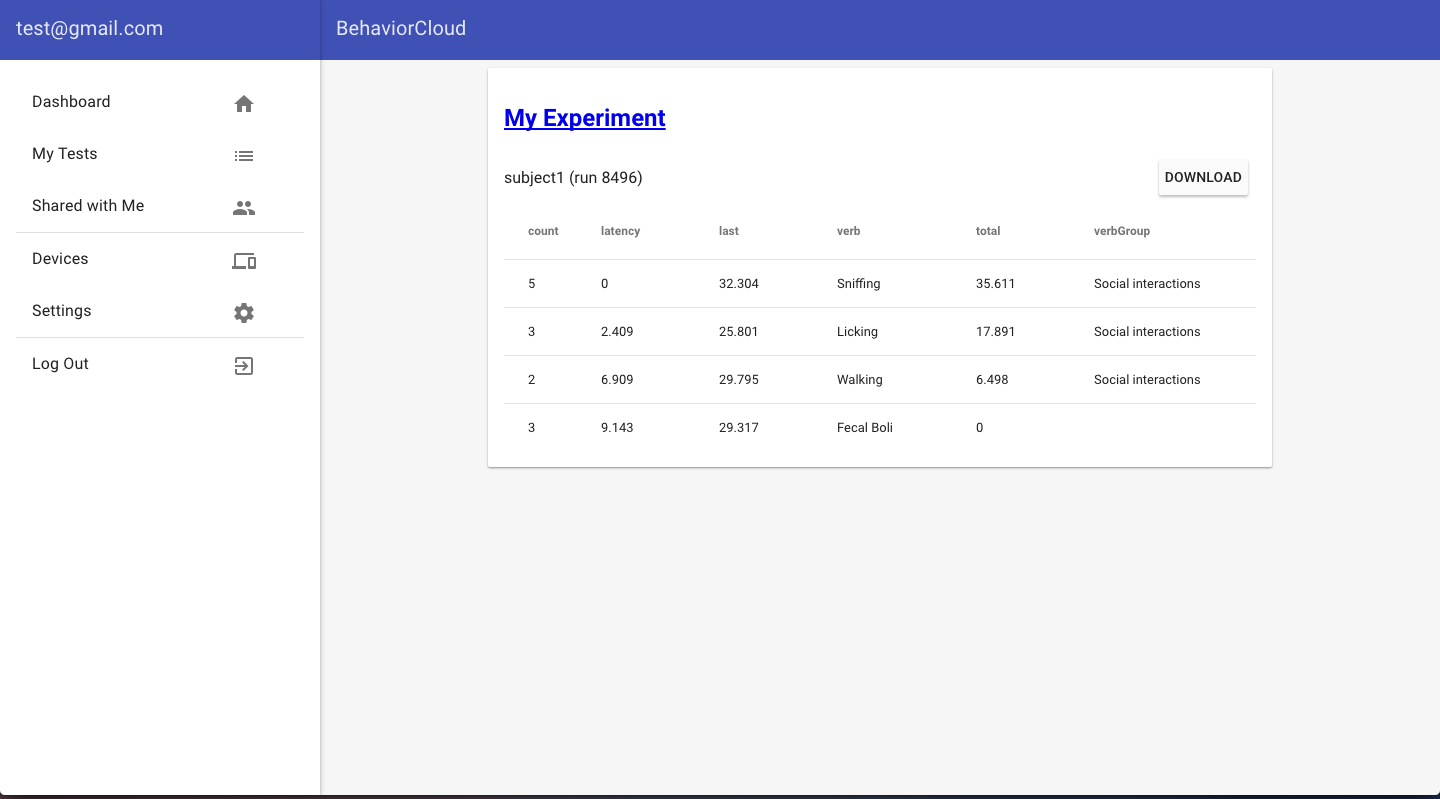
Click an individual subject to view analyzed data in the browser or click the download icon to get a .csv file with all subjects' data. For each behavior, BehaviorCloud generates a count (number of times the behavior occured), duration (total time), latency (beginning time of first bout), last (beginning time of the last bout), and the behavior label and group ID.
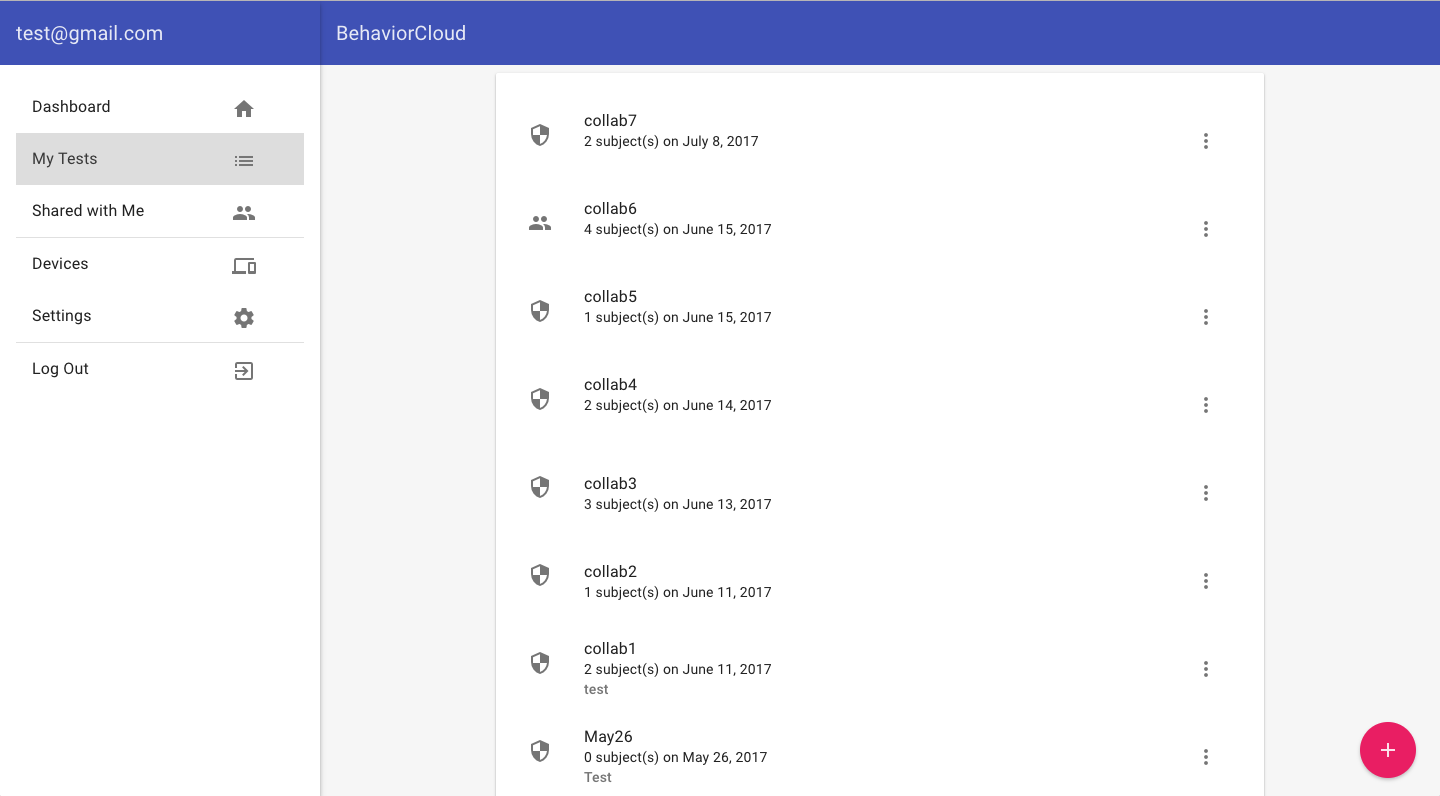
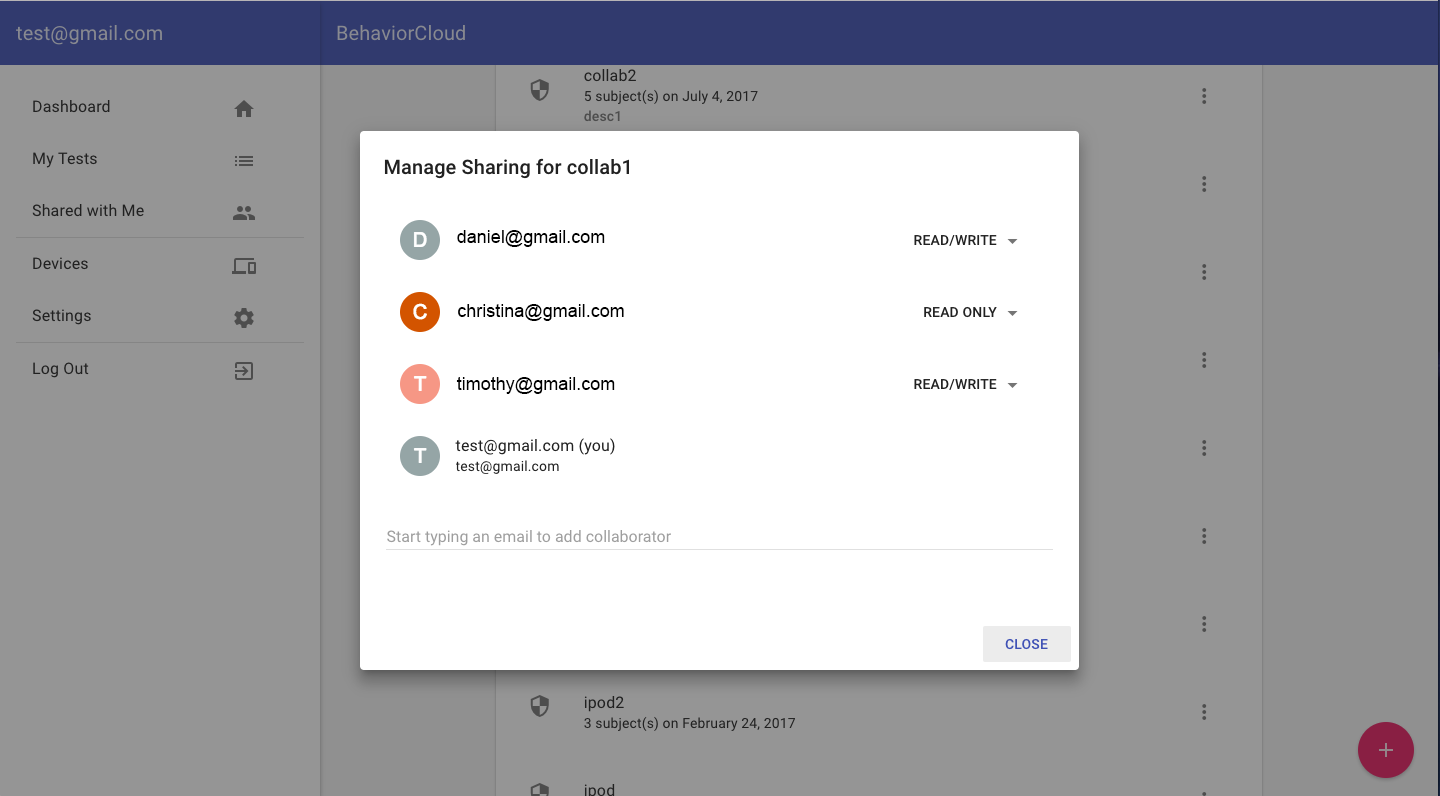
Collaboration
You can share your data and invite collaborators to contribute to any phase of the experiment through your BehaviorCloud account. Go to My Tests to view all of your experiments. Private experiments are indicated by a shield icon and shared experiments are indicated by a users icon. To add a collaborator, select the menu icon to the right of an experiment and click Manage Sharing/Collaboration. A pop-up menu will ask you to enter the email address of the person you would like to invite. Your collaborator will receive an email notification prompting them to login and access the shared experiment. The default level of permission is read only. After the person has created an account, you will be able to manage their level of permission: read only (can view data but cannot edit), read/write (can view, contribute, and edit), or admin (full permission, including to delete an experiment).
Experiments for which you collaborate, but did not create, live in the Shared with Me menu in the left-hand menu of your account.
Troubleshooting
1) No video preview
Check your WiFi connection. If WiFi signal dropped out, you may need to restart the BehaviorCloud Camera app.
2) Bumped the maze
If you need to move the maze or camera mid-experiment (or if you bumped the maze!), we recommend that you create a new test with a new calibration so your subsequent trials will have the most accurate possible distance measurements. You can combine all your data after analysis when you download the .csv files.
3) Tracking interference
BehaviorCloud is designed for robust tracking of subjects on any static background. Shadows or changes in lighting can interfere with tracking so it is recommended to follow good behavior testing practices by keeping a constant environment and not approaching the maze too closely while a trial is running. If you are testing in low light, it is advisable to do a pilot run to check tracking and adjust lighting as needed before starting your experiment. If you've already recorded trials that have interference, make sure you have set your tracking boundary as tight as possible to the maze so extraneous movements will be excluded.
4) Waiting for video upload
BehaviorCloud supports upload of most major file formats. If you are experiencing slow upload times of a non-standard video format, consider converting to .mp4 before upload or contact us for advice on your specific format. Very large files, including HD/4K video, are not recommended and will take longer to upload. Consider compressing your file before upload.
Frequently Asked Questions
1) Can I run multiple subjects in parallel?
Yes, there are two methods to do this. One way is to have multiple phones running the BehaviorCloud Camera app each recording a different subject. To control each trial, it is easiest to have your BehaviorCloud account open in multiple tabs of your internet browser so you can switch back and forth quickly. An alternate bootstrap method is to record multiple subjects from one phone running the BehaviorCloud Camera app, but to run analysis on separate tracking boundaries within the frame. At the analysis stage, you can set a Tracking Boundary for one subject and generate/export analyzed data, then come back and set a new Tracking Boundary for the other subject and generate analyzed data again.
2) How can I mount the camera phone?
You can purchase a video recording bundle from BehaviorCloud that includes an iPod and hardware for both ceiling and tripod mounting.
3) Can I record experiments in the dark?
For maze-based testing during the dark phase, dim white light or red light is sufficient for most devices to record clear video. We recommend testing your particular set-up by tracking a pilot animal before beginning real subjects. For home cage video where you may require recording in complete darkness, we recommend checking your specific device specifications and purchasing an inexpensive infrared light source from Amazon. In our testing we have found that some devices record just fine under infrared light (many Android devices) but others (iPhones) do not because they have infrared light filters built into the camera lens. Contact us for specific recommendations.
4) What if I need a wide angle lens?
In some cases, such as recording home cage video or recording from a close distance, you may find that a wide angle lens is necessary to capture the desired field of view. Inexpensive clip-on wide angle lenses specifically designed for smartphones are available on Amazon. In our testing, we have found them to be sufficient even for close up video of home cage activity. Contact us for recommendations.
5) Can you explain the variables in the analysis output?
Automated video tracking, Raw Position Data:
- time: An ISO8601 formatted date and time stamp
- xcoordinate: X coordinate of subject relative to upper left corner of video, in microns
- ycoordinate: Y coordinate of subject relative to upper left corner of video, in microns
Automated video tracking, Activity Analysis:
- totaltime: Total test time in seconds
- ambulatorytime: Total time the subject was moving, in seconds
- distancetraveled: Total distance traveled, in cm
- averagevelocity: Average velocity, in cm/s
- starttime: Start time of trial as an ISO8601 formatted date and time stamp
- restingtime: Total time the subject was resting, in seconds
- endtime: End time of trial as an ISO8601 formatted date and time stamp
- subject: Subject ID as provided by user
Automated video tracking, Zoned Activity Analysis:
- totaltime: Total time spent in zone, in seconds
- latency: Amount of time to first enter a zone, in seconds
- ambulatorytime: Total time the subject was moving within zone, in seconds
- zonename: Name of zone as provided by user
- distancetraveled: Total distance traveled within zone, in cm
- averagevelocity: Average velocity within zone, in cm/s
- starttime: Start time of trial as an ISO8601 formatted date and time stamp
- zoneentries: Number of entries into zone
- restingtime: Total time the subject was resting within a zone, in seconds
- endtime: End time of trial as an ISO8601 formatted date and time stamp
- subject: Subject ID as provided by user
Automated video tracking, Zoned Sequence Analysis:
- time: An ISO8601 formatted date and time stamp
- zone: Zone name as provided by user
- subject: Subject ID as provided by user
Automated video tracking, Spontaneous Alternation:
- spontaneousalternation: Percent alternation (number of triads / (number of arm entries - 2)) x 100
- starttime: Start time of trial as an ISO8601 formatted date and time stamp
- endtime: End time of trial as an ISO8601 formatted date and time stamp
- subject: Subject ID as provided by user
Manual scoring analysis
- count: Number of times a behavior occurred
- latency: Amount of time to first occurrence of a behavior, in seconds
- last: Amount of time to last occurrence of a behavior, in seconds
- verb: Behavior, as defined by user
- total: Total amount of time a behavior occurred, in seconds
- verbgroup: Behavior grouping, as defined by user
Technical Support
Please email or call (833) 788-6888 / +1 (614) 334-4888.